Losing your company files can cost you your business, but backups are there to save you!
You can create them manually whenever you want or schedule them to avoid any chances of data loss or corruption. For added safety, you should save the backup to an external device or a secure cloud drive. If you notice data missing or any damage, you can undo the recent changes or recover from the disaster by restoring the backup copy.
In this article, we will discuss the steps to create a company file backup in QuickBooks Desktop as well as Online and the instructions to restore the backup file whenever needed.
How to Backup a Company File in QuickBooks Desktop?
Creating a company file backup means saving or protecting your accounting data. If you ever have a problem, you can restore the backup copy. The backup includes your accounting data, templates, letters, logos, images, and related files (QuickBooks Statement Writer, Cash Flow Projector, Business Planner, and Loan Manager).
In QuickBooks Desktop, there are two ways to back up your company data: automatic and manual. This section covers the steps for scheduling both automatic backups and manual backups.
Read More- QuickBooks Crashes When Opening Company File Try This
a. Create a backup company file
We are covering step-by-step instructions for automatic and manual backup and how to restore the data file if any problem occurs someday.
Let’s schedule your automatic backup.
Instead of creating a backup manually, let’s schedule it automatically so you can worry less even if you forgot to backup the data manually:
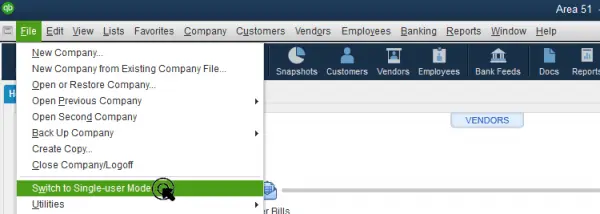
- Launch QuickBooks Desktop and go to the File menu.
- Choose Switch to Single-user Mode from the dropdown.
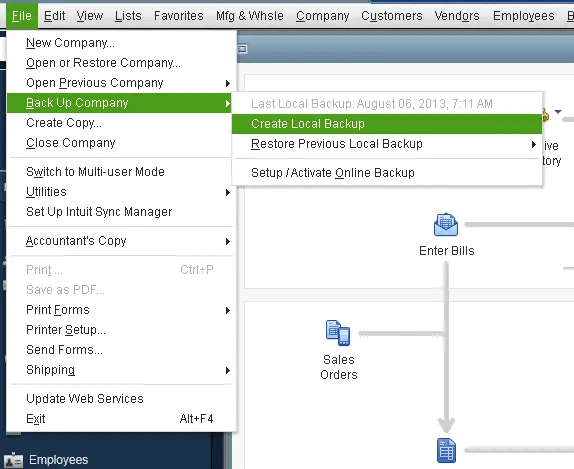
- Return to the File menu and hover over Back up Company. Now, click on Create Local Backup.
- Choose Local Backup in the prompted window and hit Next.
- Scroll down to the Local Backup Only section, click Browse and choose where you want to save the backup copy.
- Here, you can set the number of backup copies you want, which is optional.
| Tip: You do not need to mark anything on the calendar. Set up the backup reminders in the Online and Local Backup section. |
- In the Online and Local Backup section, choose Complete verification. It will run a test automatically to ensure your backup file is in good shape before you save it.
- When everything is done, click OK.
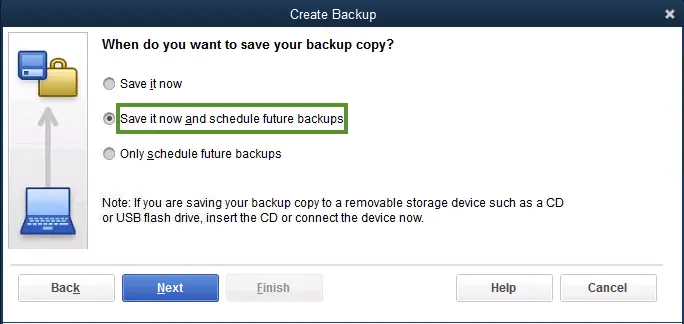
- Hit Save it now and schedule future backups. Then, select Next. If you don’t want to save a backup now, select Only schedule future backups.
- Mark the checkbox for Save backup copy automatically when I close my company file. Now, choose the number of times between backups.
- Select New to finally schedule a backup. Fill out the data fields required to create a backup. You can select a specific date, time or day for the backup.
- Once you set the schedule, click OK. QuickBooks will now ask you to enter the Windows sign-in password. This gives you permission to run the scheduled backup.
- When all set, select Finish to create a backup.
Manually backup your company file
Let’s create a company file backup in QuickBooks Desktop manually:
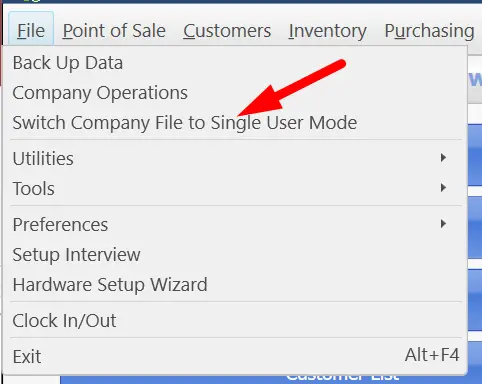
- Select File at the top of the QuickBooks menu bar.
- Click on Switch to Single-user Mode.
- Move back to the File menu and choose Back up Company. Then, click on Create Local Backup.
- Choose Local Backup in the prompted window and hit Next.
- Click on Browse in the Local Backup Only section and select the location where you want to save the backup company file.
- If you want more than one backup, specify their number. This is optional.
| Tip: No need to mark anything in the calendar. Set the backup reminders using the option in the Online and Local Backup section. |
- This will test your backup file to ensure that it is in good shape before saving.
- When all set, click OK.
- Choose Save it now and then hit Next.
b. Adjust your backup settings
In case you don’t remember when you last backed up your company file, go to the File menu and hover over Back up Company. Check the date and time at the top of your menu.
- Go to File at the top menu bar and select Back up Company. Then, click on Create Local Backup.
- Choose Options.
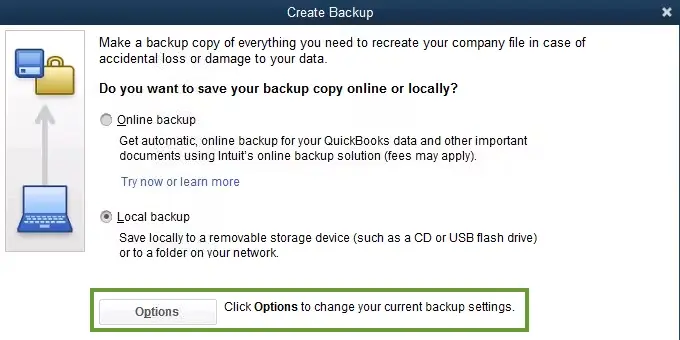
- Make the required changes and select OK.
c. Restore your company file backup
Now that you have a backup copy, you can restore the data file whenever needed. The backup file will have a .qbb extension at the end of the file name.
QuickBooks uses a backup company file (.qbb) when you restore to create a new company file (.qbw).
| Important: If you saved the backup company file on an external device like a USB or a hosting service like Box, you must go to the hard drive and proceed with the steps below. |
- Go to the File menu in QuickBooks.
- Choose Open or Restore Company.
- Click on Restore a backup copy and then Next.
- Now, select the Local Backup option and click Next.
- Browse your computer for the company file you want to backup. It should look like this: [Your company name].qbb.
- Select the folder where you want to save the restored copy and click Open.
| Note: Make sure not to use the restored company as the existing company file folder; if you do so, you may overwrite your data. |
- To avoid overwriting anything, either rename the existing company file or use a unique name for the backup copy; you can even save it in a completely different folder.
Once you’re all set, select Save. If you see a warning message about overwriting your data, choose the option that suits you best. Don’t overwrite anything unless you know you want to do so.
Learn More- QuickBooks Cannot Communicate with the Company File
How to Backup a Company File in QuickBooks Online?
Save a backup copy to keep a copy of your chart of accounts and other accounting data. If you encounter a problem, you can restore or undo the data whenever needed without making any unwanted changes. The below steps will help you to create a company file backup in QuickBooks Online:
Note: If you want to use an existing copy of your company file to start a new company, consider making a copy rather than a backup.
a. Turn on the Online Backup and Restore app for your data
- Navigate to Settings.
- Click on Back up company.
| Note: You may need to sign in to your Intuit account and then choose Authorize to proceed with the backup. |
b. Turn off automatic backup
If you no longer need to back up your company file, you can turn the settings off. Here’s how:
- In QuickBooks Online, select Settings.
- Click on Back up company.
| Note: Sign in to your Intuit account if needed and select Authorize to proceed. |
- Select the company you have set up to turn off automatic backups.
- Choose Turn off backup from the Action dropdown menu.
c. Turn on automatic backup
Here’s how to turn on automatic backups so there’s no need to worry about data loss:
- Select Settings in QuickBooks Online.
- Click on Back up company.
| Note: You may be required to sign in with an Intuit account and then choose Authorize to proceed. |
- To turn off automatic backup, select the company file it is scheduled for.
- Select Turn on backup from the Action dropdown menu.
d. Manually create a one-time backup
Do you want to create a backup manually due to sudden changes in the company file or other requirements? Don’t worry; the steps below will help you create a manual backup at any time. Here’s how:
- Choose Back up company from the Settings menu.
| Note: You may required to sign in to your Intuit account and then select Authorize to proceed. |
- Hit on Add Company.
- Now, click on the Search for a company dropdown menu and select the company you want to back up.
- Click Next and then Connect.
| Note: If you have multiple company files to backup, repeat steps 2 to 4. |
- Look for the company file you want to backup.
- Choose Run full backup from the Action dropdown menu.
e. Save your backups to Google Drive
Saving a backup to Google Drive ensures you have another backup in case your device breaks down and provides extra security to your accounting data. This way you can also save your data on another computer without worrying about moving it to another location.
Here’s how to set the backups to Google Drive:
Connect your Google Drive account
- Go to Settings in QuickBooks Online.
- Click on Back up company.
| Note: In order to continue, you may need to log in with your Intuit account and choose Authorize. |
- Navigate to the User menu.
- Choose where you want to save the backup copy and select Link Google Drive.
- Proceed with the below steps to allow QuickBooks to create company file backups.
| Note: It can take ten minutes or longer for the file to appear in Google Drive. Additionally, at this time, Online Backup and Restore is unable to restore data saved in a personal cloud archive. |
f. Restore your data from a backup
Need to restore a backup copy? You can easily restore your data using a specific date and time backup. The process can take up to an hour, but it usually takes much less time. The less data a company has, the faster it will work.
| Important: While your data is being restored via the Online Backup and Restore program, do nothing in your business. A checkmark will appear in the status when it’s ready. It’s okay to return and operate your business at that point. |
- In QuickBooks Online, choose Settings.
- Click on Back up company.
| Note: To continue restoring the data backup, you may need to sign in with an Intuit account and then select Authorize. |
- Look for the company you wish to restore a backup of.
- Now, select Restore from the Action dropdown.
- From the Date field, set a specific date you want to restore.
- Choose the time when you want to restore from the Time dropdown menu.
- Click Next and then follow the instructions on your screen.
- Choose Start Restore.
Summary
Who isn’t worried about losing their important company data, especially accounting and payroll? That’s why creating a company file backup is essential to restore the backup copy when needed or if you have any problems. The above article provides step-by-step instructions to create a company file backup in QuickBooks Desktop and Online and explains how to restore the backup.
If the above information is not helpful or you need further assistance, it is advisable to contact QuickBooks professionals. Dial +1-866-409-5111 and talk to ProAdvisor’s now!
About The Author