Windows Firewall is Blocking QuickBooks – Quick Troubleshooting
Microsoft’s Firewall, or a firewall component of Microsoft Windows, is a security application that filters the traffic that enters or exists on your device. This traffic is filtered based on various criteria, such as source and destination IP address, or source and destination port number. QuickBooks has these port numbers assigned to pass through the Firewall, which can be blocked for security reasons. The Firewall might also be considered a threat or unwanted access to pass through your computer. In this blog, we will cover the possible reasons and instances when the Windows Firewall is blocking QuickBooks with suitable fixes. Let’s go through this comprehensive guide.
If you lack expertise in Microsoft and don’t know how the Firewall works, troubleshooting the firewall issue could be risky. As an alternative, you can contact QuickBooks experts and let them handle such crucial tasks. Dial +1-866-409-5111 now!
Set up the Windows Firewall Security Settings for QuickBooks
The steps to troubleshooting firewall-blocking QuickBooks might vary depending on the situation when you encounter the issue. In the section below, find the instance where you cannot run the program function and proceed with troubleshooting solutions accordingly.
Case I: When Opening a Company File
When opening a company file, you might see an error message on your screen stating,
“Cannot communicate with the company file due to a firewall. “
This is due to the Windows firewall is blocking QuickBooks. To open a company file without interruptions, you must configure the Windows Firewall settings. Here’s how to do it:
Solution 1: Utilize the QB File Doctor
QuickBooks File Doctor utility will help you fix the firewall settings so you cannot open the company file over the network.
Adhere to the following steps to make use of the tool:
1: Get the QuickBooks Tool Hub
- Exit QB Desktop.
- Get the most recent version of QuickBooks Tool Hub (1.6.0.8) and save the downloaded file from where you can easily access it.
- Save the downloaded file (QuickBooksToolHub.exe) to a location where you can easily access it.
- Adhere to the on-screen instructions to start the installation and agree with the product’s terms and conditions.
- Once done, double-click the Windows Tool Hub icon to launch it.
2: Run Quick Fix my File
- Tap on Company File Issues.
- Choose QuickBooks Fix my File.
- Once the process is complete, click OK and launch your QuickBooks.
3: Run QuickBooks File Doctor
- Go to Company File Issues.
- Tap on Run QuickBooks File Doctor. The File Doctor tool might take some time to open.
- In the tool, select your company file from the drop-down menu.
- Choose the middle option, Check your file and then hit Continue.
- Allow the access to the company file by entering the QuickBooks admin password.
- Finally, click Next.
The scan time might take up to 20 minutes as per the file size; wait until then. Also, remember that the scan might say it’s unsuccessful even if the issues are fixed. Open the company file again and ensure the problem is fixed.
Solution 2: Download the QuickBooks Update
Sometimes, using an outdated version of QuickBooks hinders regular operations and can also cause connectivity issues. So, it is recommended to keep your QuickBooks updated to the most recent version.
- Click on the Help menu at the top.
- Tap on Update QuickBooks Desktop.
- Click on Update Now in the redirected Update QuickBooks window.
- Mark the Reset Update checkbox to clear the previously downloaded updates.
- Hit Get Updates.

- Restart your computer, and install the updates by clicking Yes.
Solution 3: Configure the Windows Firewall Settings
You might fail to open your company file when Windows Firewall is blocking QuickBooks. In that case, you must configure the Windows Firewall settings by adding the firewall port exception or by creating an exception for QuickBooks programs:
Create and Add Firewall port exception for QuickBooks
If you are using multiple versions of QuickBooks on the same computer, follow the below steps for each version:
- Tap the Windows icon from the Taskbar at the bottom.
- In the search bar, type Windows Firewall and choose the Windows Firewall application from the search results.
- Go to Advanced Settings and right-click the Inbound Rules.
- Click on New Rule.
- Choose the rule type as Port and click Next.

- Further, ensure TCP is selected.
- Enter the port number assigned to the specific version of QuickBooks:
- QuickBooks Desktop 2020 and later: 8019, XXXXX.
- QuickBooks Desktop 2019: 8019, XXXXX.
- QuickBooks Desktop 2018: 8019, 56728, 55378-55382.
- QuickBooks Desktop 2017: 8019, 56727, 55373-55377.
| Note: The QuickBooks Desktop 2019, 2020, and future versions use dynamic ports. These ports have a specific port number assigned during the installation but are variable at the end. |
- Get the dynamic port number:
- Open QuickBooks Database Server Manager on your computer.
- Move to the Port Monitor tab.
- Now, look for your version of QuickBooks and note the Port Number. This number will be required when creating the exception for QuickBooks.
Note that you can change this port number by clicking Renew. If you renewed the dynamic port number, click on the Scan Folders tab and then hit Scan Now to reset the firewall permissions. You can only renew the port numbers of QuickBooks 2019, 2020 or other future versions.
- Type the port number and then tap on Next.
- Now, click on Allow the Connection and hit Next.
- Check and confirm all the profiles are marked in the prompted window. Then, click Next.
- Finally, create the rule and give it the name QBPorts(year).
- After this, click Finish.
Repeat the same steps to create Inbound Rules, except selecting Outbound Rules in step 3.
Note: If you are using a third-party firewall, it is recommended that you visit the provider’s website to allow access to QuickBooks.
If you continue to get the firewall issue, you must make an exception for QuickBooks program files.
Create Windows firewall exceptions for QuickBooks programs
- Launch the Windows Firewall application and click on Advanced Settings.
- Right-click on the Inbound Rules.
- Select New Rule.
- Click on Program and tap Next.
- Choose This Program Path and Browse to one of the executable files below.
- Hit Allow the Connection and tap on Next.
- Ensure all the profiles are selected. Then, hit Next.
- Finally, create the rule and name it as QBFirewallException(name.exe).
Once done, repeat the above steps and create Outbound Rules except selecting Inbound Rules in the 2nd step.
| Executable files | Location |
| AutoBackupExe.exe | C:\Program Files\Intuit\QUICKBOOKS YEAR |
| Dbmlsync.exe | C:\Program Files\Intuit\QUICKBOOKS YEAR |
| DBManagerExe.exe | C:\Program Files\Intuit\QUICKBOOKS YEAR |
| FileManagement.exe | C:\Program Files\Intuit\QUICKBOOKS YEAR |
| FileMovementExe.exe | C:\Program Files\Intuit\QUICKBOOKS YEAR |
| QuickBooksMessaging.exe | C:\Program Files\Intuit\QUICKBOOKS YEAR |
| QBW32.exe | C:\Program Files\Intuit\QUICKBOOKS YEAR |
| QBDBMgrN.exe | C:\Program Files\Intuit\QUICKBOOKS YEAR |
| QBServerUtilityMgr.exe | C:\Program Files\Common Files\Intuit\QuickBooks |
| QBCFMonitorService.exe | C:\Program Files\Common Files\Intuit\QuickBooks |
| QBLaunch.exe | C:\Program Files\Common Files\Intuit\QuickBooks |
| QBUpdate.exe | C:\Program Files\Common Files\Intuit\QuickBooks\QBUpdate |
| IntuitSyncManager.exe | C:\Program Files\Common Files\Intuit\Sync |
| OnlineBackup.exe | C:\Program Files\QuickBooks Online Backup |
Note: .If you see Program Files (x86), it just means you are using the 64-bit operating system.
Review Your Antivirus Settings
If you still see issues even after configuring the Windows Firewall settings, check and ensure the antivirus on your computer isn’t causing any issues.
Visit the official site of your antivirus program to find detailed steps for configuring these settings for QuickBooks.
Solution 4: Set up the Folder Permissions Correctly
If the company file folder doesn’t have the required permissions to access the company file over the network, it is common to face issues or errors. Therefore, you must set up the folder permissions correctly by following the below steps:
Ensure that Folder Permissions are Set Correctly
- Launch File Explorer by pressing the Windows + E keys together.
- Look for the QuickBooks company file folder and right-click on it. Then, choose Properties.
- Tap on Advanced from the Security tab.
- Now, choose QBDataServiceUserXX and hit Edit.
- Configure the settings below to Allowed.
- Traverse Folder/Execute File
- List Folder/Read Data
- Read Attributes
- Read Extended Attributes
- Create Files/Write Data
- Create Folders/Append Data
- Write Attributes
- Write Extended Attributes
- Read Permissions
If these settings are incorrect:
- Right-click the company file folder and choose Properties.
- Click on Edit from the Security tab.
- Choose the QBDataServiceUserXX file and click on Full Control. Then, hit Allow.

- Now, save and apply the changes. Then, click OK.
Change the Folder Permissions
If you adjust the folder permissions or settings:
- Press the Windows icon + E keys to launch the File Explorer on your computer.
- Find these folders and right-click on them one by one:
- C:\Program Data\Intuit\Entitlement Client\v8
- C:\Program Data\Intuit\Entitlement Client\v6.0
- C:\Program Data\Intuit\Entitlement Client\v5
- C:\Program Data\Intuit\Entitlement Client\v3
- C:\Program Data\Intuit\Entitlement Client
- C:\Program Data\Intuit\QuickBooks Enterprise Solutions X.0 (X = version) or C:\ Program Data\Intuit\QuickBooks 20XX (XX = year)
- C:\Program Data\COMMON FILES\INTUIT
- C:\Program Data\COMMON FILES\INTUIT\QUICKBOOKS
- C:\Users\Public\Public Documents\Intuit\QuickBooks\FAMXX (XX = year)
- C:\Users\Public\Public Documents\Intuit\QuickBooks\Company Files
- C:\Users\Public\Public Documents\Intuit\QuickBooks\Sample Company Files\QuickBooks Enterprise Solutions X.0 (X = version) or C:\Users\Public\Public Documents\Intuit\QuickBooks\Sample Company Files\QuickBooks 20XX (XX = year)
Now, follow the below steps to change the settings. Also, keep in mind that you might not have all the folders, as some are specific to a version of QuickBooks.
- Right-click on these folders one by one and choose Properties.
- Select the Security tab and click on Everyone.
- Choose Full Control and hit Apply. Then, click OK.
Allow the Windows Access Permissions to Share Company File For Windows 10.
- Press the Windows logo key and search for File Explorer. Then press Enter.
- Now, locate your company file folder.
- Select Properties and click on Sharing. Then, hit Share Add.
- Find the corresponding file QBDataServiceUserXX for your version of QuickBooks.
- Finally, set the permission level to Full Control and hit Share.
Solution 5: Run the QuickBooks Database Server Manager
QuickBooks Database Server Manager is the component that allows you to share the company file on the multi-user network. Ensure you have installed the tool on your server computer and run it from the Tool Hub.
- Tap on Network Issues from the right panel of Tool Hub.
- Click QuickBooks Database Server Manager. If you haven’t installed the Server Manager, it will redirect you to install and set it up.
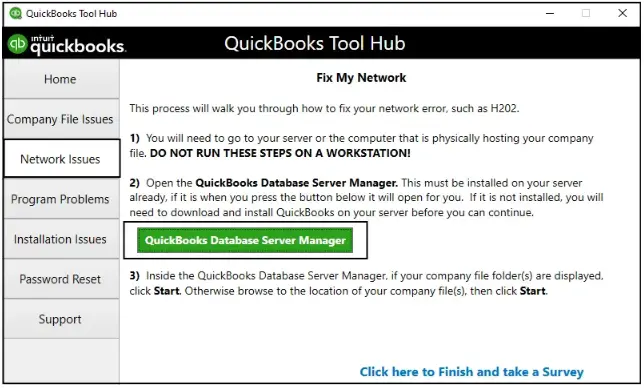
- Now, click Start Scan only if your company file folder is displayed. If not, Browse to the location of your company file and click Start Scan.
- The Database Server Manager will automatically fix the firewall issues.
- Once done, check the folder and ensure there’s a .ND file.
Solution 6: Disable the Hosting on Workstations
Your server is the main computer that saves and hosts the company file. So, if the hosting is ON on the workstation, you can’t be able to open the data file.
So, you need to ensure the hosting is enabled only on the server computer, not the workstations.
- Launch QuickBooks on any of your workstations.
- Click on the File menu at the top of your screen and choose Utilities.
- If Host Multi-User Access is an option, don’t select it. This workstation isn’t causing the issue. Move to the next workstation and follow the same steps.
- If the Stop Hosting Multi-User Access is an option, tap on it.
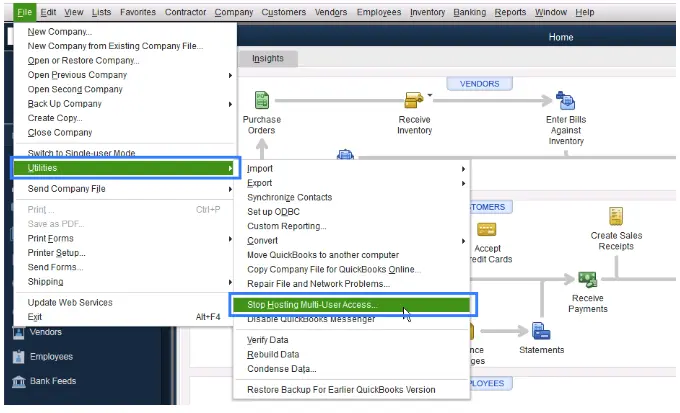
After configuring the multi-user settings for all your workstations, move to the server computer and reset the hosting settings.
- Go to the server computer and launch QuickBooks.
- Click on the File menu and hover over the cursor on Utilities.
- Select the Host Multi-User Access option. Repeat the process and select Stop Hosting Multi-User Access to reset the multi-user mode.
- Now, follow the steps mentioned above and select Host Multi-User Access.
Case II: When Downloading QB Updates
You may encounter multiple update errors such as QuickBooks error 12000 and QuickBooks error 15000 when Windows Firewall is blocking QuickBooks.
Issues can also occur due to an outdated operating system. Follow the steps below to fix the problem and continue using the most recent version of QuickBooks Desktop.
Read More: QuickBooks Desktop 2025 Release Date: Features
Solution 1: Update Windows
Get your operating system in the most recent version and then re-attempt downloading the QuickBooks update.
- From the bottom of your computer’s Taskbar, click on the Windows icon.
- In the search bar, type Settings and then hit Enter.
- Click on Update & Security.
- Click on Windows Update from the right side and then Check for Updates.
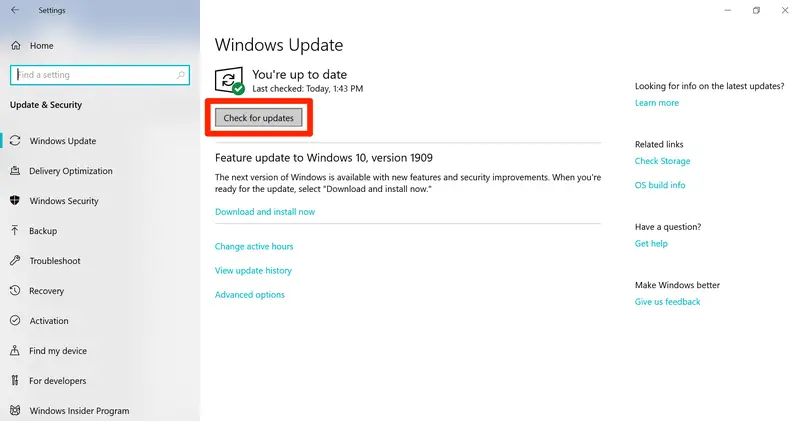
- If updates are available, click Download & Install the updates.
- Once done, restart your computer to ensure the problem is fixed.
Solution 2: Configure the Windows Firewall Settings
You must configure the Windows Firewall settings or ports to allow QuickBooks program files to run specific operations or download the most recent version of the program.
Proceed to Solution 3 in Case I to find the suitable steps to set up the Windows Firewall for QuickBooks.
Case III: When Scheduling a Company File Backup with Intuit Data Protect
Sometimes, you might fail to schedule a company file backup using Intuit Data Protect due to the firewall and might also see an error message stating,
“Intuit Data Protect Backup Failed: Firewall or connection issue.”
Multiple reasons could be involved, such as misconfigured firewall ports, highly stored caches and cookies, etc. We will discuss these below and stepwise instructions for fixing the issue where your Windows Firewall is blocking QuickBooks.
Solution 1: Run the IDP Diagnostic Tool
The IDP Diagnostic tool diagnoses and determines whether the issues are caused by Windows Firewall or other third-party applications that need configuring to allow IDP ports to create a backup. Here’s how to utilize the IDP Diagnostic tool to detect the problem:
- Look for the Intuit Data protect icon (green padlock) at the Windows System tray and right-click on it.
- Choose About Intuit Data Protect.
- Press the Ctrl + F2 keys together to launch the Intuit Data Protect Diagnostic Tool.
- Tap on Run Diagnostics.
- If there’s any issue with the firewall of a third-party application, you must configure the software settings to allow the Intuit Data Protect files. To know more about configuring your security software and hardware, you must check your manufacturer’s website and then add the following files for exceptions: C:\Program Files(X86)\Common Files\Intuit\Data Protect\IntuitDataProtect.exe. C:\Program Files(X86)\Common Files\Intuit\Data Protect\IbuEnghost.exe. C:\Program Files(X86)\Common Files\Intuit\Data Protect\QBIDPServices.exe.
Solution 2: Add the Windows Firewall Ports
Go through the following steps to configure the Windows Firewall ports for Intuit Data Protect:
- Open the Windows Start menu and type Control Panel in the search field.
- Go to System and Security from the right panel and select Windows Firewall.
- Go to Advanced Settings and select Inbound Rules from the left side.
- Click on New Rule from the same window.
- Enter the following port numbers and then hit Next. Incoming Port: 80 Outgoing Ports: 443, 16841
| Note: Intuit Data Protect requires HTTP Ports 80 and 443 to connect to the internet. If you can browse the internet and successfully log into the secure website, Intuit Data Protect should work. |
- Follow the on-screen prompts.
- Now, repeat the above steps to create an Outbound Rule for QuickBooks.
Solution 3: Add Trusted Sites
Using a website with no secure HTTPS connection can be the biggest threat as the data might be transmitted without any security, which could be malicious, too. Not having a security certificate could be why your website is blocked.
Get your website encrypted by adding it to Trusted sites; here’s how to do this:
- Launch Internet Explorer.
- Go to the Tools menu and tap on Internet Options.
- Click on the Security tab, then uncheck the Enable Protected Mode checkbox.
- Choose Trusted Sites and tap on Sites.
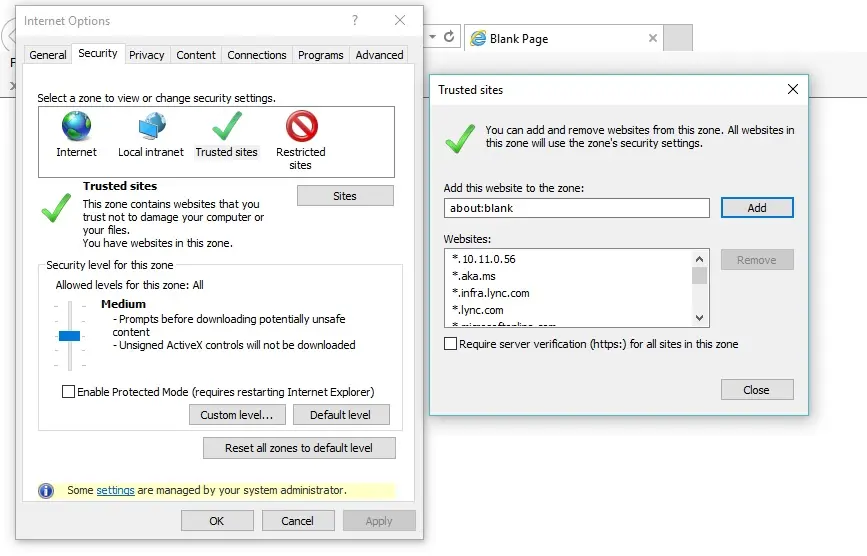
- Uncheck the Required server verification ( https: ) for all sites in this zone checkbox.
- Now, add these websites: *backup.com *.intuit.com *.intuit.net.
- Then, click Close.
- Move to the Privacy tab and select Sites.
- Add the following websites: *.quickbooks.com and *.intuit.com to the Address of the website checkbox.
- Each time add the web addresses, click Allow.
- Finally, click OK.
Solution 4: Clear the Cache, Cookies, Temporary Files and SSL State of Internet Explorer
Excessively stored cache, cookies or temporary files can slow down your website and the performance as well, causing the issues when creating a backup.
Additionally, you also need to ensure the SSL State of Internet Explorer is clear to ensure you are using a secure connection.
- Launch Internet Explorer and move your cursor to the Tools menu.
- Select Internet Options.
| Note: If you can’t see the Tools menu in your browser, you may find it in the hidden tabs. Press Alt to show them. |
- Select Delete… from the General tab under the Browsing History section.
- Now, choose the following checkboxes: Form Data, History, Temporary Internet files and website files, Cookies and website data and InPrivate Filtering, then uncheck the Preserve Favorites and Website data checkbox.
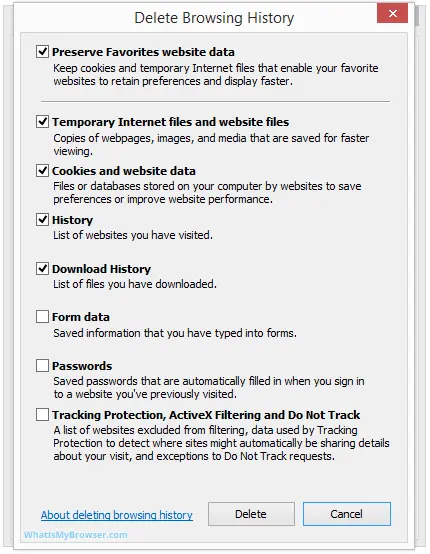
- Clear these items by clicking Delete.
- Tap on the Content tab.
- Choose Clear SSL State and hit OK.
Case IV: When Using QuickBooks Payments
You must configure the security settings when the Windows Firewall is blocking QuickBooks for uninterrupted payment process. As all the web-based credit card or bank processes uses SSL to transmit data through firewall ports. Incorrectly configured Windows Firewall can blocks ports and hence interrupting the overall payment processes. You may also encounter the following error messages:
- Page cannot be displayed
- Server response reported an error
- Error 404, Error 500, etc
- Your request requires escalation
- Time out messages
- The page you are trying to view is taking too long to respond
- Script errors
- Blank page
To ensure these payment based service are working without any interruption, you must add these ports as an exception. Here’s how you can do it:
Solution 1: Configure the Windows Firewall Settings
If the Windows Firewall is blocking QuickBooks or the third-party payment applications, you must configure it and add the port as an exception, allowing the data exchange. We recommend you visit Solution 3 in Case I to find out the comprehensive steps on how to configure the Windows Firewall.
Check out the ports and application files below when creating exceptions rather than using the ones mentioned above.
Open and enable these internet ports for merchant related applications:
- 8443 (UDP and TCP)
- 443 (UDP and TCP)
Enable these applications for internet access:
- QBW32.exe
- QBPOS.exe
- EFTSVR.exe
Enable these domains for QuickBooks payments access:
- *.intuit.com
- *.innovativemerchant.com
- *.innovativegateway.com
Solution 2. Change the User Account Settings
As a Windows security feature, UAC protects your operating system from unauthorized changes. If other users make these changes, your payment process might fail.
For any system changes requiring administrator permissions, the UAC will notify the user if they want to allow the change. So, consider changing the UAC settings by following these steps:
- Press the Windows + R icon key to launch the Run prompt.
- Type Control Panel in the search field and then press the Enter key.
- Click on User Accounts and then select User Accounts (Classic View).
- Tap on Change user account control settings.
- Now, move the slider: – To disable UAC, set it to Never Notify and click OK. – To turn on UAC, set it to Always Notify and click OK.

- Finally, restart your computer.
Summary
So, this was all about Windows Firewall is blocking QuickBooks in different instances and interrupting various operations. The solutions provided above, as per the different instances, must have helped you eliminate the problem and let you run your operations smoothly.
However, if you continue to see the different error messages and need assistance on handling such critical variations, you must connect with QuickBooks professionals. Dial +1-866-409-5111 and connect with a QuickBooks ProAdvisor now!
Frequently Asked Questions
To stop the Windows Firewall from blocking a program, you must configure its settings using its specific port number and operations files. After configuring and allowing the software through its ports, the Windows Firewall will not block it.
Incorrectly configured Windows Firewall settings or needing the proper permissions to access through ports can be why Firewall is blocking QuickBooks. Also, the security application might consider QB a threat to your computer, which could also be another possible reason.
The Windows Firewall enforces a secure connection using SSL (Secure Sockets Layer), a cryptographic protocol that ensures secure communication over a computer network.
On your main computer, open Microsoft Defender Firewall and then choose a network profile, such as a Domain network, Private network, or Public network. Now, switch the setting to Off under Microsoft Defender Firewall.
It is recommended not to keep your Firewall turned Off for too long, as it could make your device more vulnerable to unauthorized access.
Yes, you must restart your computer after configuring it or making changes. Some apps require you to restart to save a new socket and update the changed settings.

