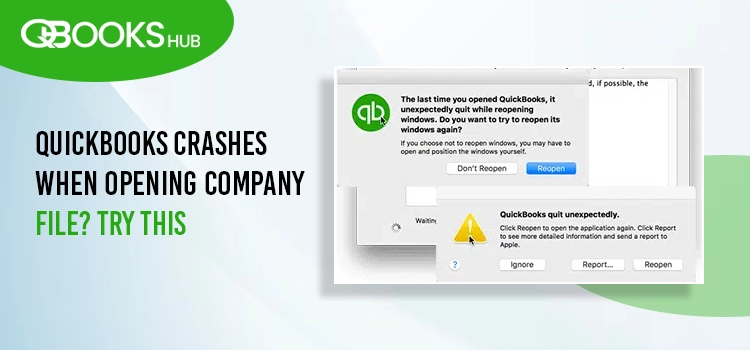
Does your company file not open, or does your QuickBooks crashes when opening company file?
A company file in QuickBooks is a crucial component that holds all of your financial data. You must attempt to open the file to send payroll, working on the company file or other crucial operations. Rather than being busy with your processes, you might see an interruption where QuickBooks crashes when opening company file, which creates a tough situation to handle.
To get past the problem, we will discuss what triggers the QuickBooks crash and how to address it. So, let’s go through this extensive guide to find the suitable fixes.
Why is QuickBooks Not Responding When Opening Company File?
Let’s discover the possible reasons why your QuickBooks program is suddenly crashes or become unresponsive when trying to open a company file:
- You might be using an older version of QB Desktop
- Not keeping the Windows operating system up-to-date
- Your company file might get damaged or corrupted
- Incorrect installation of QuickBooks or damaged program files
- Damaged or missing QBWUSER.ini
- Hosting settings might turned on your workstations
- Any damages to the .ND and .TLG
- Your company file location might get corrupted
Try These Fixes for QuickBooks Crashes When Opening Company File
Unless the QuickBooks crashing is fixed, you won’t be able to open or work in your company file. Therefore, after knowing why the issue occurs, let’s move to the below section and perform the troubleshooting steps-
1. Update QuickBooks Desktop
To have an uninterrupted experience with the company file or other processes, you must use an updated version of QuickBooks. Let’s take a look at how you can get the newest version of the program:
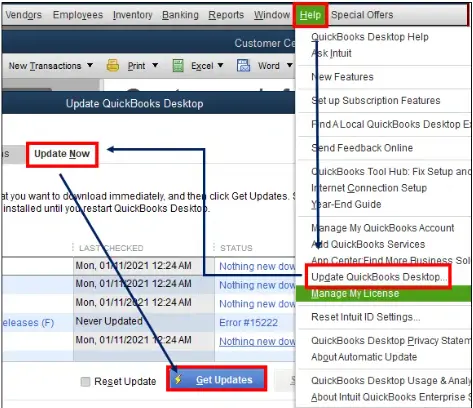
- Click on Help from the top menu bar.
- Select Update QuickBooks Desktop.
- The Update QuickBooks windows will open.
- Choose the Update Now tab.
- Mark the Reset Updates checkbox to clear the previous updates.
- Hit the Get Updates.
- Reopen your QuickBooks and tap Yes to install the updates.
2. Download the Windows Update
Sometimes, outdated operating systems can cause issues or hinder you when opening the company file, which can lead to a sudden crash. Learn how you can get the latest version of Windows:
- Launch your computer and then press the Windows icon on your keyboard.
- Type Settings in the search field and hit the Enter key on your keyboard.
- Press Enter.
- Select Windows Update.
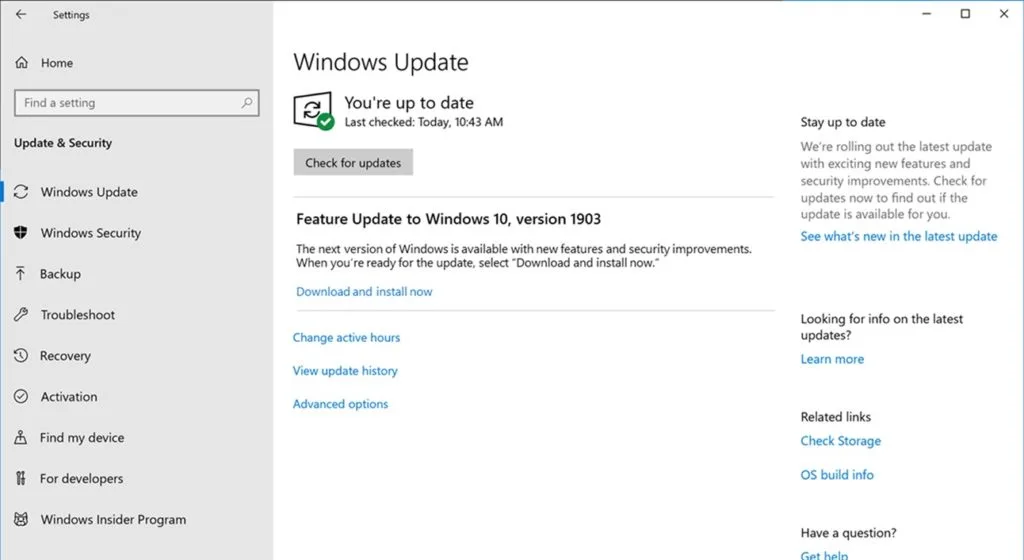
- Choose the Check for Updates button from the right panel of your screen.
- If the updates are available, hit on the Download & Install update.
- After that, restart your computer and try again to open the company file.
3. Review Whether the Issue is with the Company File or Program
Let’s run a test to identify whether the issues are with the company file or with QuickBooks Desktop:
- Press the Windows logo icon key on your computer.
- Holding down the Ctrl key and then choose QuickBooks. Don’t release the Ctrl key until the program opens.
- Now, click on Open a Sample File.
- If QuickBooks doesn’t open the sample file and displays the error, it means the issue lies with the program.
- If the file opens successfully; it shows the data damage or other issue with the company file.
4. Utilize the Use of Verify and Rebuild Data Tool
The Verify Data tool discovers issues in a company file, and Rebuild Data handles rebuilding the damaged data or fixing the issues.
Verify your company file data
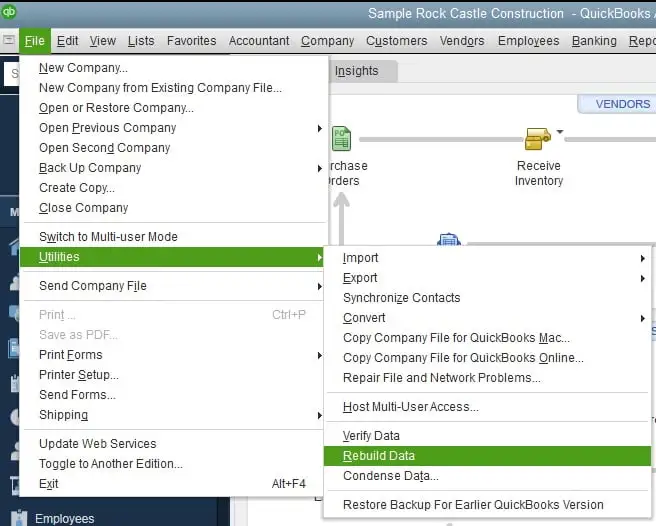
- Select Close All from the Window option in QuickBooks.
- Click on File from the top menu bar, then Utilities.
- Tap on Verify Data. Now, you will see: – QuickBooks detected no problems with your data: There is no issues detected with your company data. – An error message – Your data has lost integrity: Data damaged found and needs to rebuild.
Rebuild the data damages
- Go to the File menu> Utilities> Rebuild Data.
- Before rebuilding the data, QuickBooks will ask you to create a company file backup. A backup ensures your data is safe and secure in case rebuilding fails.
- Select an easily accessible location save the backup file and then hit OK. When saving the file ensure you are replacing the already existing one. Now, save the file while giving it a new File Name, then click Save.
- When the rebuild is completed, you will get a message Rebuild has completed. Then, click OK.
- Move back to the File menu and then Utilities.
- Further, hit on Verify Data to ensure all the issues are fixed.
5. Repair Your QuickBooks Program
Tools such as Quick Fix My Program and QuickBooks Install Diagnostic run a quick fix to your program.
Follow the stepwise instructions mentioned below to get past the QuickBooks crashing:
Download and Install QuickBooks Tool Hub 1.6.0.8
QuickBooks Tool Hub is a hub of multiple utility that helps you fix multiple errors and issues. You must download and install QuickBooks Tool Hub 1.6.0.8 in the most recent version to get the best out of Tool. It is also recommended to use it on Windows 10, 64-bit for better experience.
Run Quick Fix my Program
The Quick Fix my Program will shut down all the background processes and run a quick fix to your program. Here’s how to utilise the tool:
- Click on Program Problems from the right menu bar.
- Further, hit on the Quick Fix my Program button.
- Reopen your QuickBooks Desktop and try again to open your company file.
Run QuickBooks Install Diagnostic Tool
The Install Diagnostic Tool run a quick test and determines if something went wrong during installation. If the issues is detected, it also run a quick fix to address the problem.
- From the right side of Tool Hub, click on Installation Issues.
- Click on QuickBooks Install Diagnostic Tool. The tool usually takes sometime to complete the process; wait for sometime until the process completes.
- Once done, open QuickBooks and try again to open your data file.
6. Rename the QBWUSER.ini file
You might encounter an issues when opening a company file due to damaged or missing QBWUSER.ini file. Renaming the file might help you fix the issue.
| Note: Renaming the QBWUSER.INI file automatically erases the previously opened company file. So, you need to reopen the file manually. |
- Locate to Users[Your user name]AppDataLocalIntuitQuickBooks [year] and then look for the QBWUSER.INI file. Check Hidden files and folders if you cannot see the file.
- Select and right-click on the same file and click on Rename.
- Write the .old word at the end of the file name (QBWUSER.INI.OLD) and save it.
- Now, name the EntitlementDataStore.ecml file again.
- Finally, reopen QuickBooks Desktop to save the changes.
After renaming the QBWUSER.INI file, try to open a sample company file. If you are able to open the company file; you’re good to go. If not that means the problem lies with QuickBooks program and needs to be repair.
7. Run QuickBooks File Doctor
The QuickBooks File Doctor is designed to handle the problems going on with the company file; here’s how to utilize it:
To run the File Doctor utility, ensure to download and install the QuickBooks Tool Hub in the most recent version.
- Tap on the Company File Issues menu in the Tool Hub.
- Select Run QuickBooks File Doctor. It can take longer time than expected; wait until then.
| Note: Manually search for File Doc in the Windows Start menu and then open it, if you fails to access the tool. |
- Now, choose your company file from the drop-down menu. If you couldn’t see the file, click Browse and then locate or search the data file.
- Allow the permission to access the company file by entering the QuickBooks admin password and click Next.
- Depending on the file size, the scan time many vary, it usually take 15-20 minutes to finish the scan.
8. Reinstall QuickBooks in Selective Startup Mode
Selective Startup Mode lets you disable the unnecessary Windows apps or service that might interfere with the normal installation of QuickBooks.
Step 1: Switch Your Compute to Selective Startup Mode
- Open the Run command by pressing the Windows + R keys together on your keyboard.
- In the Run prompt, enter msconfig and then click OK. You will redirected to the System Configuration window.
- Click on the General tab and then select Selective startup and Load system services.
- Tap on Disable.
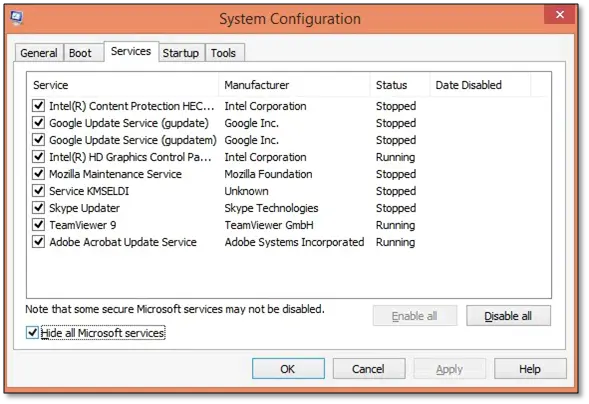
- Deselect the checkbox of Hide all Microsoft services.
- Find the Windows Installer service in the list and then select it.
- Click OK.
- Now, hit Restart on the System Configuration window.
Step 2: Uninstall QuickBooks Desktop
- Launch the Windows Start menu by pressing the Windows icon key.
- In the search bar of Windows Start menu, type Control Panel and then press OK.
- Tap on Uninstall a Program from Program and Features.
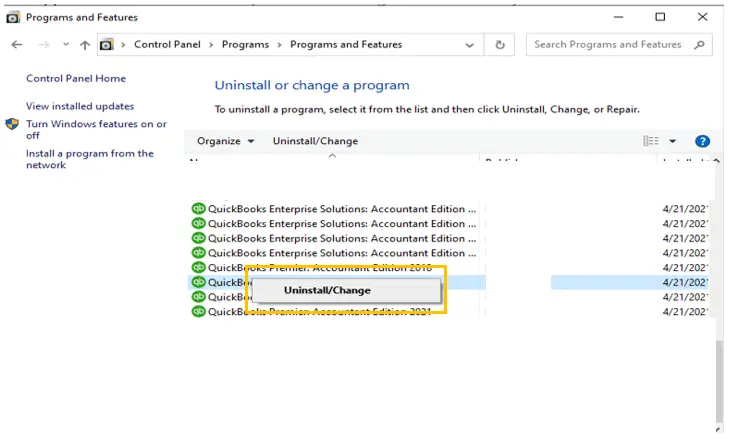
- Now, find the version of QuickBooks you want to remove and select it.
- Select the Uninstall/Change option and tap on Remove. Then, click Next. If you don’t see the option, sign out and then sign in again with the all admin rights.
Step 3: Reinstall the QuickBooks Program
- Check and ensure your computer is connected to a strong network connection.
- Look for the QuickBooks installation file QuickBooks.exe and then double-click on it.
- Choose Express Install as the installation path to save the preferences of your previous version of QuickBooks and when reinstalling the program. Otherwise, Custom and Network Options is recommended.
- Click on Next.
- Hit the Install button.
- When done, open QuickBooks and try again to open your company file.
After this, switch your QuickBooks back to the normal mode:
- Launch the Run command.
- Type msconfig and hit OK.
- Choose Normal Startup from the General tab.
- Click OK.
- Select Restart on the window.
9. Turn Off the Hosting Mode on Workstations
Your server computer is the one that hosts a company file on the network, not the workstations. So, the hosting mode should be enabled on the server, not the computers that are connected to it:
- Launch QuickBooks on workstation where you can’t open the company file.
- Choose File from the top menu bar and click on Utilities.
- If you see the Host Multi-User Access option, avoid it and move to the next workstation.
- Now, follow the same steps File> Utilities.
- If you see the Stop Hosting Multi-User Access option, select it.
- Repeat the same steps on each workstation where you can’t access the company file.
- Finally, reopen QuickBooks and try again to open the company file.
10. Edit the .ND and .TLG Files
The .ND and .TLG are the configuration files of QuickBooks that allows you to open the company file. In case these files are damages or corrupted, you will fail to access the data file.
Follow the below steps to rename these files and replace them with new ones to address the problem:
- Locate the folder that has your company file and open it.
- Now, find the .ND and .TLG extension files. company_file.qbw.nd company_file.qbw.tlg
- Right-click on each file and click on Rename from the drop-down menu.
- Add .OLD extension at the end of your company file name such as, company_file.qbw.tlg.old and company_file.qbw.tlg.nd.
- Launch your QuickBooks again to ensure the .ND and .TLG files are replaced with the new ones and the issues is also resolved.
11. Move Company File to Another Location
A damaged company file location can be reason why QuickBooks crashes when opening company file.
If you are hosting the company file on the same computer, ensure no active user is signed out of it.
- Press the Windows + E together to launch the File Explorer.
- Now, look for the company file folder which will be named as [Your company name].qbw.
- Choose your company file and right-click on it, then tap on Copy.
- Right-click anywhere on your computer’s home screen and then choose Paste.
- Launch QB Desktop and then select File from the top menu bar.
- Tap on Open or restore company from the options.
- Locate the company file you just copied and select it. Then, click Open.
If you can open the company file, it shows issues with the location. So, it is recommended that you move the company file to another location or folder. For company file sharing on the network, create a new folder and then share it.
Talk to an Expert
Overall, the troubleshooting steps mentioned above are all you need to fix QuickBooks crashes when opening company file. From fixing the damaged or corrupted company file to installing the QuickBooks Desktop again, we have discussed stepwise instructions to address the problem.
However, you might still see the issue or get stuck during the technical steps. In such a critical case, consulting with QB ProAdvisors is recommended. So, dial +1-866-409-5111 now!
Frequently Asked Questions
Using the Verify and Rebuild Data utility can help you fix the corruption in the company file. Go to File> Utilities> Verify Data to verify your file data. If you receive ‘Your data has lost integrity,’ you must run the rebuild. To do so, move again to the File menu> Utilities> Rebuild Data.
The Quick Fix my Program utility runs a quick fix to your program, addressing the performance-related issues.
First, get the QuickBooks Tool Hub in its most recent version. Once done, launch the tool and go to the Program Problems menu. Now, choose the Quick Fix my Program button to run a quick fix to QB Desktop. After the process, ensure to restart your computer.
Data corruption can happen anytime due to hardware issues, network problems, issues with your QB program, installation errors, etc. You can even encounter corruption issues due to incorrect data.
The missing, damaged or corrupted program files can be why your QuickBooks has stopped working. You can resolve such problems by running, removing, and then installing QuickBooks Desktop again.
Intuit also offers tools to handle such issues; Quick Fix my Program and QuickBooks Install Diagnostic Tool will help you return to your financial operations.
Running the diagnostic tool can help you address the crashing issue. To run the tool, access the QuickBooks Tool Hub and ensure you use the most recent version.
Now, select the Program Problems menu from the left menu and click on QuickBooks Program Diagnostic Tool. Once the process is complete and the crashing issues are fixed, restart your computer and reopen QuickBooks to ensure the issues are fixed.


