Whether you use QuickBooks Desktop or Online, you can easily manage invoices, email them, and print them on the go. But sometimes, users cannot print invoices in QuickBooks and may even fail to save their documents as PDFs. This probably hampers your business operations and causes delays to your critical business operations.
If you also face such printing issues and are looking for ways to get rid of them, this article is all you need! We have some proven methods you can use to get back to business operations. This guide has covered comprehensive troubleshooting steps to carry out when QuickBooks invoices are not printing correctly.
Read More- QuickBooks Email Not Working? Try These Solutions
Cannot Print Invoices in QuickBooks Desktop? Try These Fixes
You can fix ‘cannot print invoices in QuickBooks’ in various ways in both the Desktop and Online version. Once you understood the possible causes, just move ahead with the troubleshooting methods discussed below.
1. Print from another program
Let’s make sure you can print from any program. In these steps we will be using Notepad. You can try printing from any program you have, provided it is not QuickBooks.
- Launch the Windows Start menu by pressing the Windows logo key.
- Search for Notepad and hit the Enter key.

- Type something and go to File, then select Print.
- Choose your printer and click on Print.
2. Test the Printer setup
Proceed with the below steps to review the printer setup. This helps you make sure the printing setup is accurate.
a. Make sure the printer is setup correctly
- Turn off your printer and restart your computer.
- Now, turn on your printer again.
- In the Windows Start menu, search for Control Panel and press Enter.
- Now, double-click on Printers and Faxes.
- If it shows your printer is offline, right-click on the printer and choose Use Printer Online.
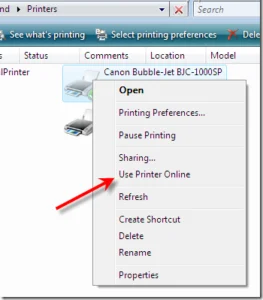
- Double-click on your printer, select Printer if it shows print jobs in the queue.
- Select Cancel All Documents.
- Exit the window.
- Right-click on the printer and choose Properties.
- Now, select Print Test Page.
| Note: If you use a network printer and it fails to print the test page, the network issue can be the reason. |
b. Make sure the printer is the right one
- Select the File menu at the top menu screen.
- Click on Printer Setup.
- Choose the form you would like to print.
- Select a different printer such as the Microsoft XP printer.
- Go to Help in this area for more help with these settings
c. Print to a different printer
- Lunch QuickBooks and go to the File menu.
- Click on Printer Setup.
- Choose the form that you want to print.
- Now, make sure to print using a different printer, like the Microsoft XP printer.
- Navigate to Help in this area for more help with these settings.
3. Test your company file
Any data damage or corruption to the company file or QuickBooks program can also be why you cannot print invoices.
Test whether the issue lies with the company file or QuickBooks Desktop and fix the issues by following the steps below.
Test your company file
- Try to print a different form, or if you use customized forms or memorized reports, try to print a standard form or report.
- If you are printing a batch of forms in QuickBooks, try to print a single form first. If successful, try printing smaller patches.
- Open any of your QuickBooks sample company files and try to print the same type of form or report. If this works, you must rebuild company file data to resolve the data damages in your regular company file and try to print it again.
Related Post- QuickBooks Crashes When Opening Company File? Try This
Here’s how to resolve the data damages:
- Click on the File menu at the top and select Utilities.
- Select Rebuild data.
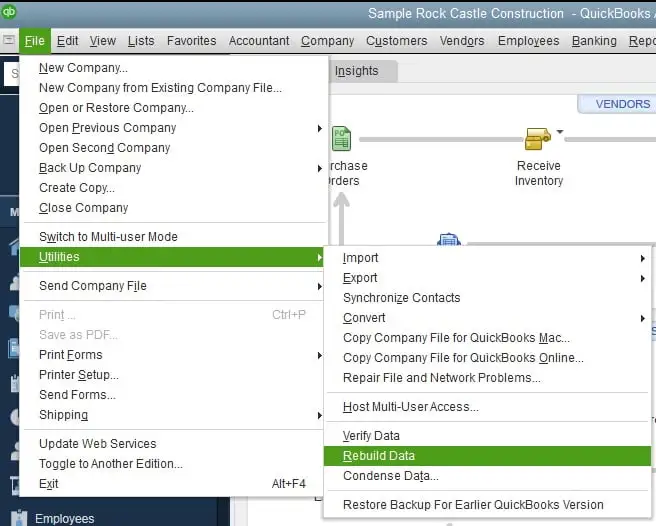
- Click OK on the redirected QuickBooks Information window. Follow the instructions displayed on your screen to save a backup copy.
- Let the tool run to repair the data damages which might take some time. If QuickBooks seems stuck, but as long as you can move your mouse, the tool is working.
- Once the tool finishes the process, select OK.
- Go to the File menu and hover over Utilities, then click on Verify Data.
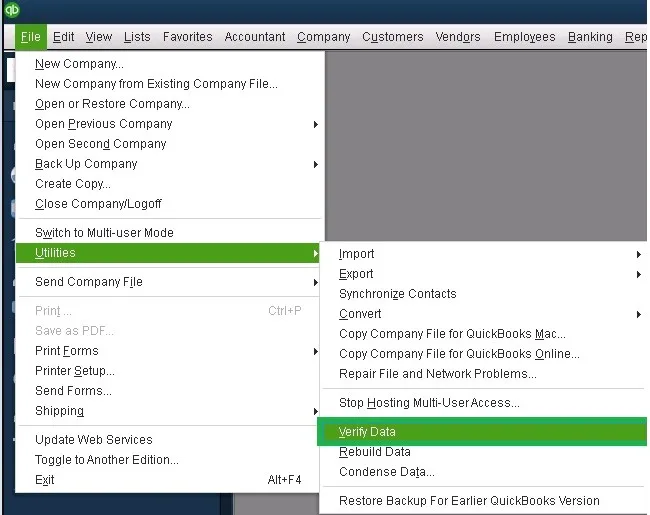
- Let the tool detect the data issues in your company file.
- If QuickBooks doesn’t find any issues with your data, click OK. Now, try again to print your invoices as your company file don’t have any data damages.
- Select Rebuild now if QuickBooks finds an issue with your company file.
Also Read- QuickBooks Cannot Communicate with the Company File: Fixing It
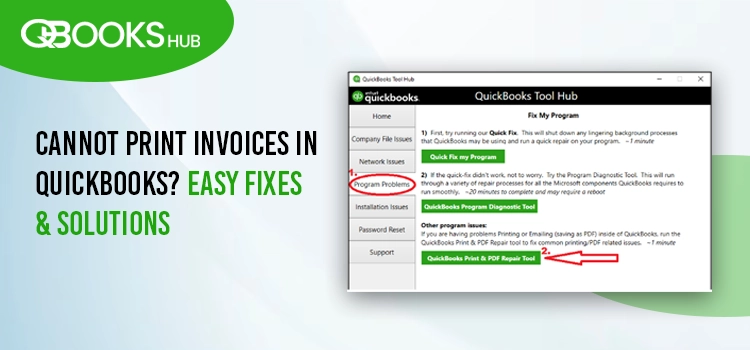
4. Run the Print and PDF utility
The Print and PDF utility runs a quick repair to the printing components of QuickBooks and lets you print your invoices seamlessly.
To access the tool, you must download and install QuickBooks to the latest release. Proceed with the below steps to run the tool:
- Launch QuickBooks Tool Hub on your computer.
- Select Program Problems.
- Hit on QuickBooks PDF & Print Repair Tool. This might take some time to run.
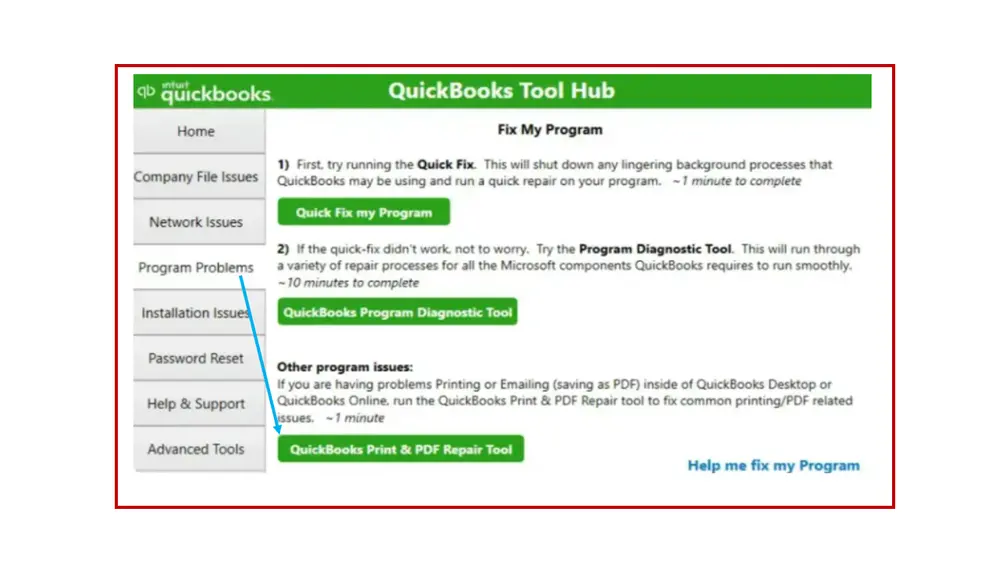
- Now, try again to save as a PDF from QuickBooks Desktop again.
5. Manually rename the QBPrint.QBP file
Cannot print invoices in QuickBooks? Consider renaming the QBPrint.QBP file to make sure there are no issues associated with the file that are interrupting the process of printing your transactions. Here’s how to do so:
- Look for the QBPrint.qbp:
- Windows 10 and newer: C:\ProgramData\Intuit\QuickBooks 20xx (20xx represents the version of your QuickBooks.)
- Server 2012 and newer: C:\Program Data\Intuit\QuickBooks YEAR and C:\Users\**remote user**\AppData\Roaming\Intuit\ YEAR VERSION\TSPrinterSettings
| Note: You may encounter an odd situation, as some Terminal Service users report finding duplicate copies of the Qbprint .qbp file. We recommend double-checking all folders for odd instances. Tip: You may find the file in the Display hidden files and folders or simply search for files using Windows to find these files in Windows. |
- Now, rename the QBPrint.qbp file: – Right-click on the QBprint.qbp file for the QB version you use and select Rename.
- Now, add .OLD at the end such as QBPrint.qbp.old.
- Launch your QuickBooks Desktop. – Navigate to File and choose Printer Setup.
- Choose any of your transactions in the Form Name list and click OK. This replaces the old and creates a new QBprint.qbp file.
- Try again to open and print your transactions or invoices.
| Note: You don’t need to do this for every transaction. |
6. Repair QuickBooks program
The Quick Fix my Program will shut down any process in the background lingering with QuickBooks and runs a quick repair to your program. Now,
- Launch QB Tool Hub and click on Program Problems.
- Click on Quick Fix my Program.
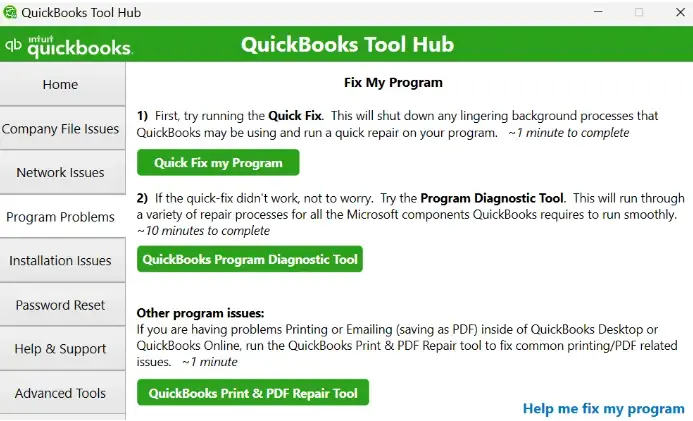
- Launch QB Desktop and try again to open your data file.
Run the QuickBooks Install Diagnostic tool
If something happens during the installation, it can cause problems when you run the QuickBooks operations, such as printing your invoices or other documents. Make use of the QB Install Diagnostic tool to fix the issues:
- Launch QB Tool Hub and go to Installation Issues.
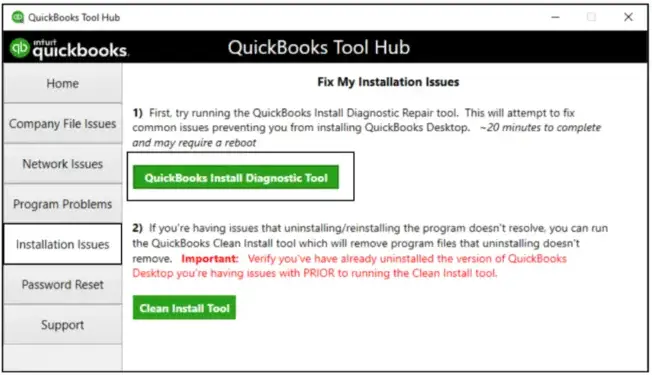
- Tap on QuickBooks Install Diagnostic Tool. The tool might take up to 20 minutes; let the tool run until then.
- When the tool finishes the process, restart your computer and try again to print your invoices in QuickBooks Desktop.
- Make sure to update your QB Desktop to the latest release to ensure you have the most recent fixes and security updates.
7. Re-install QuickBooks Desktop
Re-installing QuickBooks Desktop replaces the old program files with the names by renaming them and fixing the associated issues. Let’s see how to remove and install QuickBooks Desktop again:
Before you get started
- Get the installer of the same version as your QuickBooks Desktop.
- Keep the license number noted; you will find it in the original package. Check the purchase confirmation email to see if you bought it online.
| Note: You can also get the same information from your account management portal. |
a. Remove QuickBooks
- Press the Windows logo icon to launch the Windows Start menu.
- Search for Control Panel and hit Enter.
- Go to Programs and Features, or you can simply click on Uninstall a Program.
- Choose the QuickBooks Desktop version you want to remove from the list of programs.
- Now, hit on Uninstall/Change, Remove and then Next. If you don’t see the option to remove QuickBooks, sign out to Windows and then sign in again as an admin.
b. Install QuickBooks Desktop again
- Make sure your computer has an active internet connection.
- Locate the QuickBooks.exe file and double-click on it.
- Now, choose
- Express install – This way, you can install the new version in a different location and keep the prior version on your system. It will not save the version preferences to the new one.
- Custom and Network Options – You can install the new version on a different location and keeps the prior version installed. The preferences will not be added to the new version.
- Select Next and then hit on Install.
- When it’s done, choose Open QuickBooks.
Learn More- QuickBooks Update Stuck or Not Working? Here’s What to Do
Do This If You Cannot Print Invoices in QuickBooks Online
Did you fail to print your invoices in QuickBooks Online? This could happen due to common browser issues or any damage or corruption to your printing software, such as Adobe Reader or Acrobat. This section explores ways to fix why you fail to print your documents. Let’s walk through them one by one:
1. Update, repair, or re-install Adobe Reader/Acrobat
Using an outdated version of Adobe Reader/Acrobat, or a damaged one, and if the installation is corrupted, you will automatically fail to print your invoices or transactions, even if QuickBooks Online has no issues. Perform the below steps to update, repair, or re-install Adobe Reader/Acrobat:
a. Update Adobe Reader/Acrobat
When updating Adobe Reader/Acrobat, make sure you have the latest features and recent security patches. Follow the steps below to update the software manually as well as automatically:
Update Adobe Reader/Acrobat automatically
Install the Adobe Reader updates by following the below steps:
- Launch Adobe Acrobat Reader or Acrobat on your computer.
- Select the hamburger menu and select Help.
- Click on Check for updates.
- Proceed with the on-screen steps in the Updater window to download and install the latest updates.
Update Adobe Reader/Acrobat manually
Proceed with these steps to get the Acrobat updates:
- Launch the Adobe Reader/Acrobat and select Help.
- Choose About Adobe Acrobat Reader.
- Note down your product version.
- Visit the Adobe Acrobat Reader Downloads page.
- The web page will automatically detect which OS and the reader version you use.
- Click on Install Now only if the web pages indicate a newer version available.
- Locate and double-click on the downloaded file and follow the instructions.
b. Repair Adobe Reader/Acrobat
- Exit Acrobat/Reader and all other windows on your browser.
- Press the Windows icon key on your keyboard.
- Type Control Panel in the search field and hit Enter.
- Click on Programs and Features.
- Choose Acrobat or Adobe Reader, then select Uninstall/Change.

- Hit on Next in the Setup dialog box.
- Choose Repair and then click Next.
- Tap on Install.
- When this finishes then click on Finish.
- Now, restart your computer.
- Now, login to QuickBooks Online and try again to print.
| Tip: If you still fail to print your invoice, it may be necessary to uninstall and then install your Adobe Reader. |
c. Re-install Acrobat Professional
| Note: Adobe Reader is a program, but Acrobat Professionals is not. Do not install Acrobat Professional until you have a DVD or installation download and product key/serial number from Adobe. Otherwise, consider installing the Adobe Reader again. unless you. |
Uninstall Adobe Reader
- Exit Acrobat/Reader and all open web browser windows.
- Click on the Windows icon on the left of your screen.
- Search for Control Panel and then hit Enter.
- Click on Programs and Features.

- Now, choose Acrobat or Adobe Reader, then Uninstall/Change.
- Click Yes to confirm.
Install the Acrobat/Adobe Reader again
For the reinstallation of Acrobat Professional, use the DVD or the installation download you received from Adobe. Visit https://get.adobe.com/reader/ to reinstall the Adobe Reader.
Once this is done, log back into your QuickBooks Online company and try again to print.
2. Make sure you can print a local PDF document
Here’s how to check if you can print PDF documents in QuickBooks Online:
- If you saved a PDF document to your hard drive, open it from within Acrobat/Reader using the File menu and run the test to make sure you can print it.
- In case you do not have a local PDF document, use the Windows search and search for all files and folders using *.pdf.
You also Read- QuickBooks Form 941: File and Print Your Federal form
3. Make sure you can view and print a PDF document from your browser
Sometimes browser issues can also interfere with printing invoices or saving them as a document. To make sure your browser is working fine, run a test and then try again in the software:
- Open the browser on your computer and access QuickBooks Online.
- Now, open any PDF in the browser. If you don’t have one, use this: http://www.irs.gov/pub/irs-pdf/f1040.pdf
- View this PDF in the browser view. In case you can’t view the PDF, try bypassing the plug-in.
To bypass the plug-in:
- Click on the Windows icon on your Window taskbar.
- Choose Programs or All Programs or click on Adobe Reader.
- Navigate to Edit and then choose Preferences.
- Select Internet under the Categories: section.
- Now, uncheck the Display PDF in browser check box.
- Click OK.
- Allow the installer window to finish.
- Close and start your computer again.
- Once done, move to the IRS site and try to print the 1040 form.
4. Make sure you can print a PDF document from QuickBooks Online
If you can print PDF documents it means QuickBooks Online is working well to print your invoices. You need to close the software and restart it. However, if you fail to do so, you need to repair and update by following the steps above.
Let’s try to print PDF documents in QuickBooks Online:
- Login to QuickBooks Online like you normally would.
- Go to your QuickBooks Online file and open a transaction.
- From the bottom of your document, select Print.
- If you fail to print the document, choose any one: – In case you haven’t updated or repair Adobe in a previous step, go to Updating, repairing or reinstalling Adobe Reader and follow the steps in the above steps.
Summary
Invoices are easy to read, allowing you to maintain your records and facilitate convenient reconciliation. If you cannot print invoices in QuickBooks, you won’t be able to hand over paper invoices or add them to your records. This blog covers the possible causes of printing interruption and the steps to fix printing issues in QuickBooks Desktop & Online. This will help you print your transactions easily.
However, if you fail to do so or need assistance, it is recommended that you connect with QuickBooks professionals. Dial +1-866-409-5111 and talk to an expert now!
Frequently Asked Questions
Let’s discover the most common reason why you fail to print out of QuickBooks:
• Printer setup is configured incorrectly
• Selecting the wrong printer
• Data damage to your company file
• Using an older version of QuickBooks Desktop
• Your printer may not be connected to your computer
If you are using an older version of QuickBooks, do not meet the minimum system requirements, or the Internet connection is interrupted, your QuickBooks Desktop may fail to display invoices. Be sure to fix these problems and try again to print your invoices.
Pull up an open invoice report and then print your invoices by following the below steps:
• Click on Reports from the left pane.
• Type Open Invoices in the search bar.
• To get the invoice information, filter the details you need by clicking Customize then Run report.
• Hit on the Printer icon.
• Make the required adjustment to the printer settings.
• Finally, select Print.
If you have created a sales order and also fulfilled it, you must create an invoice. Let’s create an invoice from the Sales Orders window:
• From the Sales Orders tab, select the Create Invoice button.
• You will see a prompt on your screen, select:
– Click on Create invoice for all of the sales order(s) to add all the items from your sales order to the invoice.
– Choose Create invoice for selected items only if you wish to put some items on your invoice.
• Make the required changes to your invoice.
Note: In the list of items, enter a quantity in the To Invoice (Or Invoiced) column for each item. In case you don’t want to list your invoices in the list, enter 0 (zero) as the quantity.
• Click on Save & Close.
Make sure the printer is connected to your computer, and then connect it to QuickBooks by following the below steps:
• Select File form the top menu bar.
• Click on Printer Setup.
• Choose the form you would like to print.
• Now, select your printer.
• Verify that the printer you wish to use has the same name as yours. If not, you’ll need to adjust the printer setup on your computer.
About The Author