Are you a QuickBooks Desktop user looking for steps to move your data from QuickBooks Desktop to Online? Don’t worry—this comprehensive guide will help you!
QuickBooks Online offers more efficient workflow and the convenience of working from anywhere without the need to spend time in the office. Get more done by accessing QuickBooks Online using any device reg, regardless of location. Not only does it ensure data security, but it also enhances your productivity.
Mobile apps easily sync with QuickBooks Online, providing a seamless experience. Now, you can run and view reports using your smartphone and even send invoices from anywhere. We will help you determine if you are suitable for migration and the pre and post-steps to move your data and easily converting QuickBooks Desktop to Online.
Is Migration the Right Move for You?
Read the following sections to learn whether you need for converting QuickBooks Desktop to Online using Intuit’s internal tools.
Determine whether you migrate to QuickBooks Online
Whether it’s QuickBooks Online or QuickBooks Desktop, both are great accounting and management software, yet there are some differences you should consider to determine if your company is a good candidate for migration.
The company file is where you store all business information including inventory, employee information, customer lists, banking history, accounting records, etc. Convert QuickBooks Desktop to Online depends on how complex your data file is.
Larger companies typically store large data such as extensive history, large inventory, and large overall file sizes. If you have a fairly large company file, you may not be suitable for data migration. However, you still have a chance to convert QuickBooks Desktop to Online. For this, visit our article published on their website or consider talking to QuickBooks professionals.
If you are a small or medium-sized business and you have a comparatively small file and are using QuickBooks Desktop Pro, Premier, or Premier Accountant, you are a good candidate for migration to QuickBooks Online, as the complexity of your company file will be relatively low.
Before you begin the conversion, review the features below that your company needs to run the business. Some of these differences are detailed in the section below.
| I use QuickBooks Desktop to… | Can be done in QuickBooks Online | Can be done in QuickBooks Desktop |
| Access my company file and manage my data | ||
| Back up my data | All editions | All editions |
| Revert to prior version of my company file | Advanced | All editions, with backups |
| Work with my accountant | All editions | All edition |
| Access my company file remotely | All editions | All editions |
| Allow multiple users to access my company file | Essentials, Plus, Advanced | All editions |
| Maintain multiple company files | Requires additional subscriptions | All editions |
| Work with multiple QuickBooks windows open at once | All editions | All editions |
| Work with my customers | ||
| Create and manage invoices and bill customers | All editions | All editions |
| Create and manage estimates, send to customers, convert to invoices, and use progress invoicing | All editions; progress invoicing in Plus and Advanced only | All editions |
| Track sales, accept payments, and calculate sales tax | All editions, with QuickBooks Payments | Not available |
| Track sales and expenses in multiple currencies | Essentials, Plus, Advanced | All editions |
| Track projects including time expenses, pending payments, unbilled work | Essentials, Plus, Advanced | All editions |
| Invoice with batch invoicing | Plus, Advanced | All editions |
| Prevent sales to customers with overdue invoices | Not available | All editions |
| Work with my suppliers | Not available | Not available |
| Manage bills and pay my suppliers | Essentials, Plus, Advanced | All editions |
| Billable expenses | Plus, Advanced | All editions |
| Track and manage contractors | All editions | All editions |
| Manage employee data | ||
| Track employee time, including billable hours | Essentials, Plus, Advanced | All editions |
| Pay employees, efile payroll taxes, and print and file T4s | All editions, with Enhanced Payroll | All editions, with Payroll subscription |
| Use online banking | ||
| Connect to my bank, download transactions, and reconcile | All editions | All editions |
| Undo previous bank reconciliations | By an accountant, in QuickBooks Online Accountant | All editions |
| Manage inventory | ||
| Use the FIFO method to track inventory quantities, sales revenue, and COGS | Plus, Advanced | Not available |
| Use Average Costing method to track inventory | Not available | All editions |
| Set and manage inventory reorder points | All editions | All editions |
| Create and run reports | ||
| Track income and expenses and organize according to tax categories | All editions | All editions |
| Run custom, profit and loss, expense, and balance sheet reports | All editions | All editions |
| Forecast sales and expenses | Plus, Advanced | Premier |
| Create custom reports with Intuit Statement Writer | Not available | Not available |
| Use Advanced Reporting | Not available | Not available |
If any of these features seems in issue for your company file or data, you must not migrate your company file data.
See what you can transfer to QuickBooks Online
Intuit lets you migrate or transfer most of the information from your company file to QuickBooks Online without having to manually re-enter it after converting from QuickBooks Desktop. However, there are still some pieces of information that get converted to QuickBooks Online and require you to manually add data to the online software.
The information that gets converted to QuickBooks Online will be managed differently than in QuickBooks Desktop and may also require you to make some adjustments to your data after the migration.
The information that will not convert or transfer to QuickBooks Online automatically will need to be manually entered after the migration is complete.
Additionally, there are some features that are available in one version but not in the other. Review these features and make the suitable adjustments to set up.
Prepare your company file data for migration
Your company file must be in good condition before the migration. Apart from this, there are some other points you should do to ensure that your company file is ready for migration.
Follow the steps below to ensure that everything is in order before you convert QuickBooks Desktop to Online:
1. Create a company file backup
Regularly backing up your company file keeps your data safe. This way you can restore the backup copy even if you fail in converting QuickBooks Desktop to Online or in cases of data loss or corruption.
Follow the below steps to create a company file backup before migrating:
- Go to the File menu> Switch to Single-user Mode if you are currently in multi-user mode.
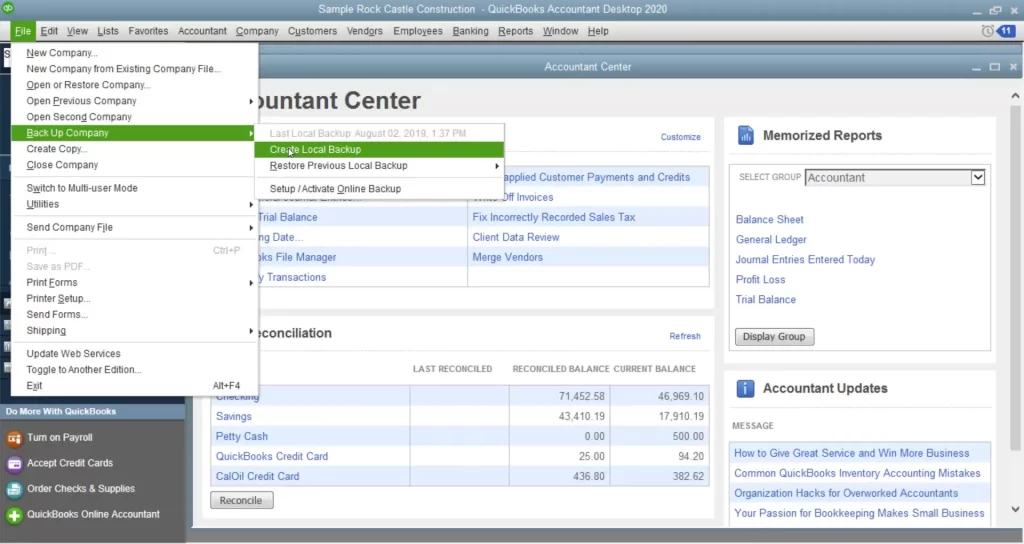
- Navigate to File> Create Backup… and then select Local backup.
- Choose Local Backup in the prompted window and click Next.
- Move to the Local Backup Only section and select Browse, then choose the location to save the backup copy.
- Set the number of backup copies, which is optional.
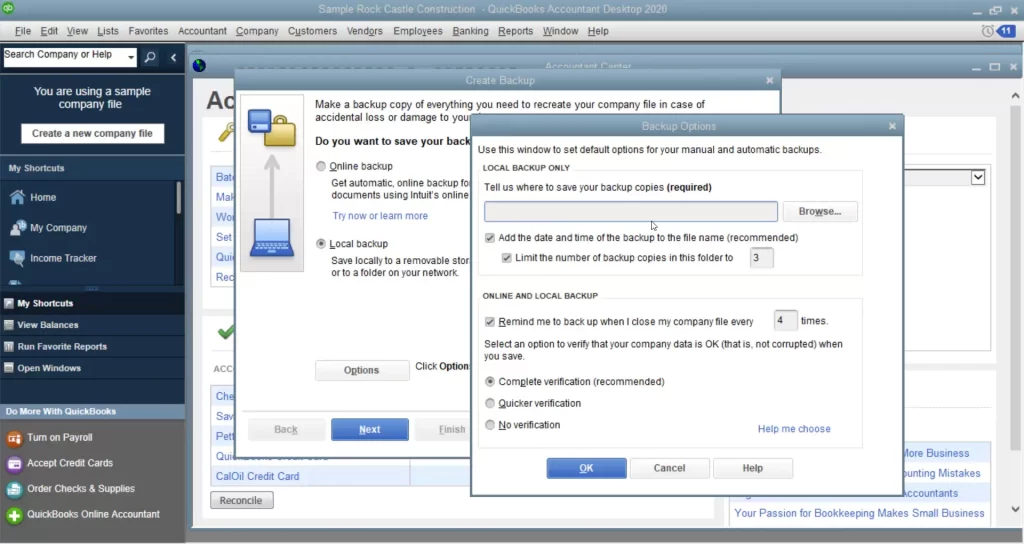
- This will run a test on your company file to make sure the data is accurate.
- Now, click OK to proceed.

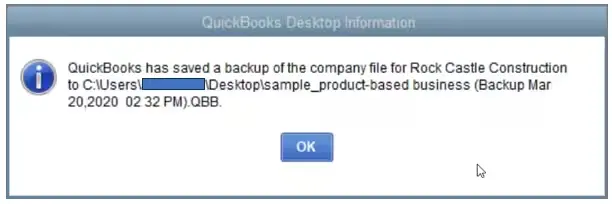
- Select Save it now and then click Next.
- Once done, you will see a confirmation message.
2. Download the most recent QuickBooks update
Using an updated QuickBooks Desktop version ensures that you have the latest security patches and features. An older version may not be compatible with Windows or may cause problems during migration. So, you must update QuickBooks Desktop to the most recent release.
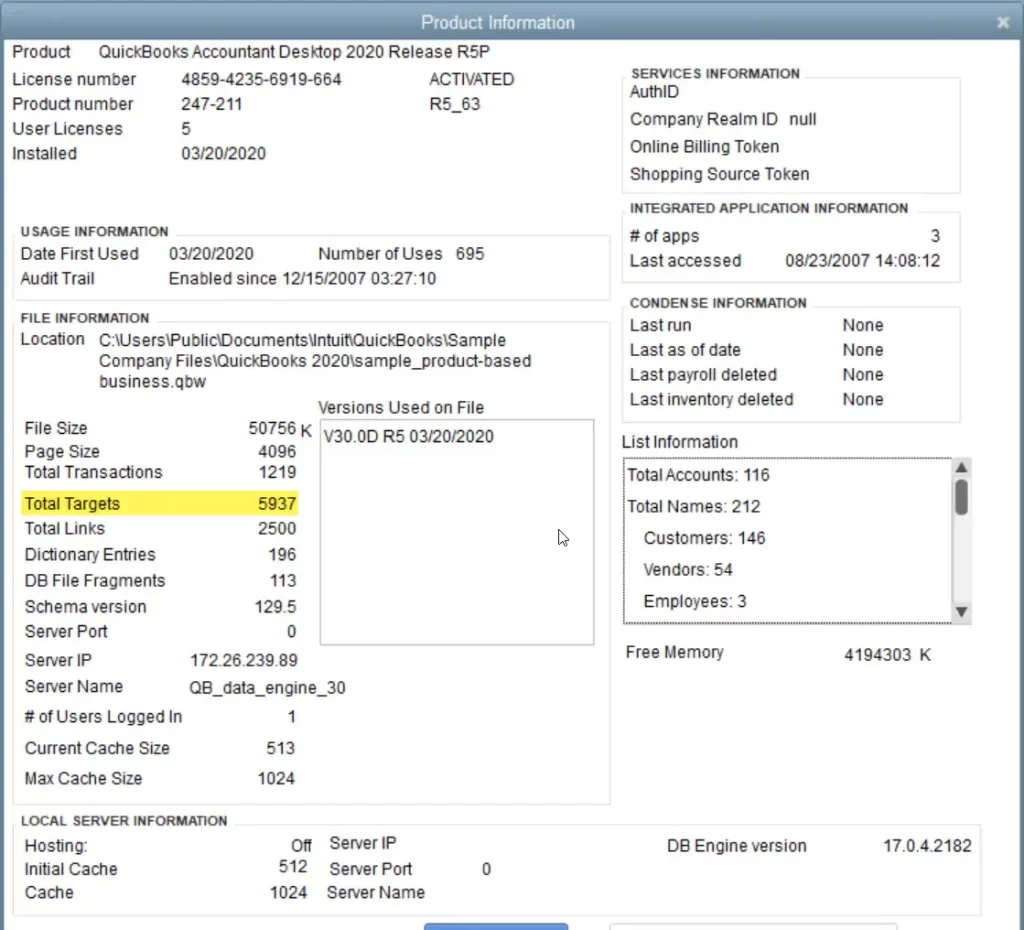
3. Review Total Targets in your company file
The data conversion depends on the number of targets. Press the Ctrl+1 keys on your keyboard to launch the Product Information window. Now, review your Total Targets. The Total Targets will be displayed in the File Information section.

You are only eligible for a list and balances conversion if the Target number is or exceeds 1,200,000 for Canada and over 500,000 for the UK and South Africa (ZA). In that case, you must check out other articles or reach out to professionals.
4. Remove Ministere du Revenu (outside of Quebec only)
Proceed with the below steps to learn how to remove Ministere du Revenu by following the below steps:
- Click on Supplier Centre from the Suppliers menu.
- Look for Minsitere du Revenu.
- Then, open your supplier.
- Go to Sales Tax Settings.
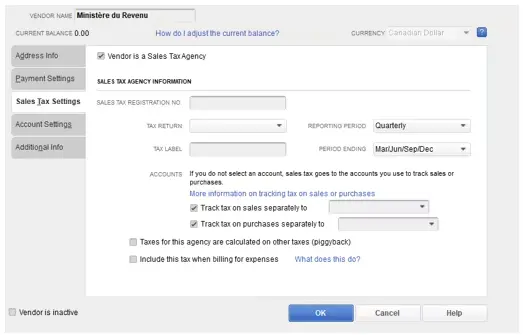
- Uncheck all the checkboxes.
- Now, mark your supplier as inactive.
- Exit the window by clicking OK.
5. Disable payroll in the QuickBooks Desktop file
Turning off payroll in the QuickBooks Desktop file helps avoid payroll issues before converting QuickBooks Desktop to Online. Here’s how to do so:
- Select Edit from the top menu.
- Click on Preferences from the drop-down.

- This will display the Preferences window.

- From the left menu bar, click on Payroll & Employees.
- In the redirected Preferences window, select the Company Preferences tab.
- Choose the suitable option for No payroll.
6. Save the Sales Tax Liability report
Once the migration is complete, you must adjust the entries. Now, to ensure that these entries are accurate, save or print a copy of your sales tax liability report by following the steps below:
- Select Reports from the top menu bar.
- Click on Vendors & Payables.
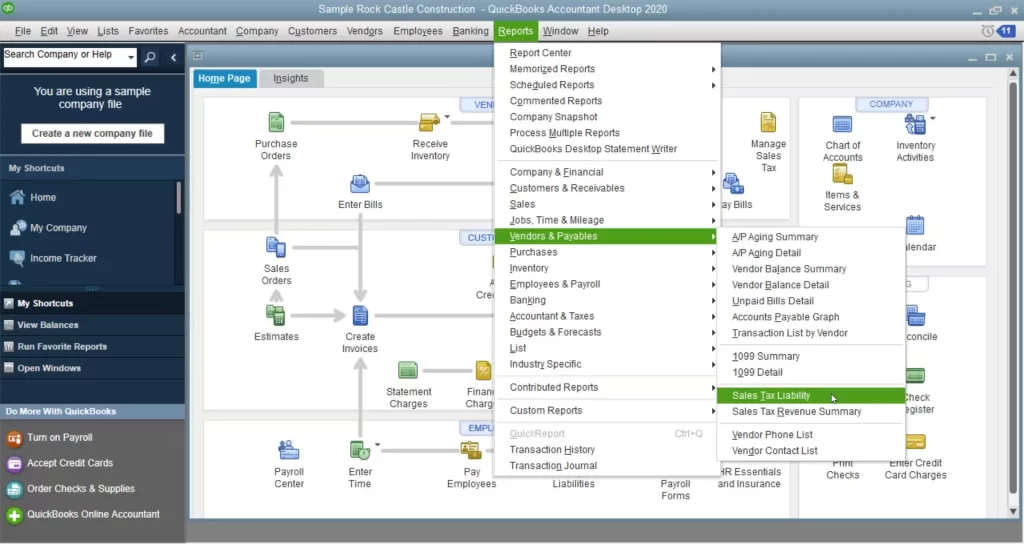
- Further, choose Sales Tax Liability.
- Select All from the Dates dropdown.
- At the top, select Save as PDF from the Print dropdown.
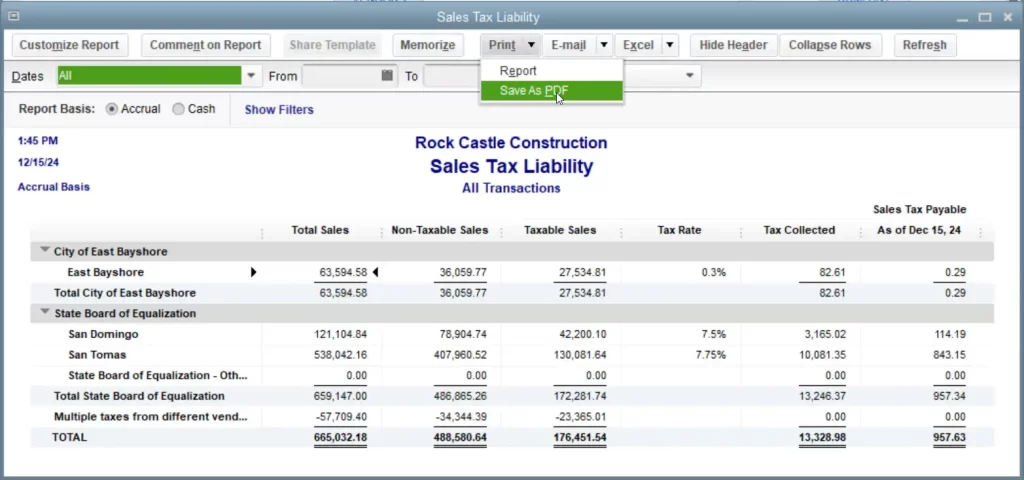
- Select the location where you want to locate the file and click on Save.
- Finally, get a printed copy if you need a hard copy.
7. Export your financial reports and lists
| Note: Exporting your lists and reports is optional and usually only necessary if your organization has more than 1,200,000 targets. If not, you can go straight to the section on creating a QuickBooks Online account. |
Avoid setting up lists one by one and export your lists before migration in QuickBooks Online, saving time and effort. Follow the below steps to export your reports and lists from a QuickBooks Desktop company:
- Launch QuickBooks Desktop.
- Go to the Reports menu and then select Report Centre.
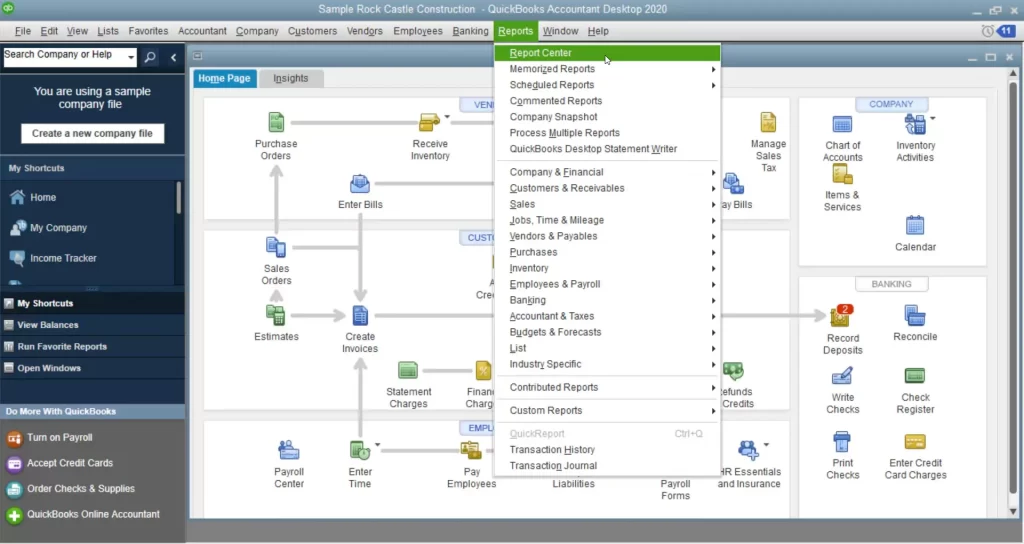
- Find your report and open it.
- Set a specific date for exporting your financial reports and lists from the Dates dropdown menu.
- Choose Excel from the toolbar. To save the report as PDF, you may also select Print or Email.
- Now, select Create New Worksheet from the Excel drop-down. This way, you can create a new Excel workbook. However, select Update Existing Worksheet if you want to update an existing workbook with the data in an open report.
- Select Export and then locate the workbook on your system.
- In case you would like to format your data specifically, choose Advanced (This is optional).
- Did you see a message saying reports has too may columns? Select Advanced, uncheck the Space between columns checkbox, and select OK.
- When everything is done, click OK.
Repeat the above steps to export other reports.
8. Create a QuickBooks Online account
Create a QuickBooks Online account and obtain a subscription to start converting QuickBooks Desktop to Online. Be sure to select the appropriate plan for your needs and review the minimum system requirements for QuickBooks Online. This ensures that you enjoy the best user experience.
| Note: You can transfer your data to QuickBooks Online as soon as 60 days after you sign up, so make sure you’re ready to migrate before you create an account and get a subscription. |
Now, sign in to QuickBooks Desktop using the credentials. If you forgot your password, use the Password Reset tool in QB Tools Hub to reset it.
Convert your data from QuickBooks Desktop to QuickBooks Online
Your QuickBooks Desktop file is ready to be transferred to QuickBooks Online. Adhere to the below steps depending on the QuickBooks desktop version you use:
| Note: If you are using a version of QuickBooks Desktop that is older than 2017, you will need to convert your file using a trial version. |
1. QuickBooks Desktop Pro or Premier
- Launch QuickBooks Desktop and sign in as an administrator to the company file you’re importing.
- Go to the Company menu and then hit on Export Company File to QuickBooks Online.
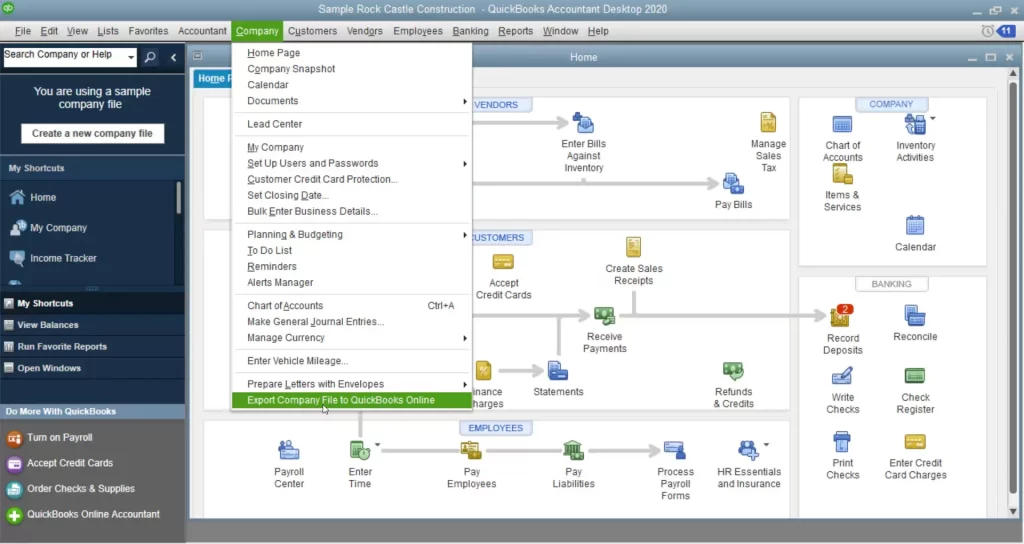
- Click on Get started.
- Hit on Select destination.
- Then, try again to sign in to your QuickBooks Online account.
2. QuickBooks Desktop Enterprise
- Launch your QuickBooks Desktop program.
- Login to your company file as an admin that you are importing.
- Press the F2 key on your keyboard to launch the Product Information window.
- Press CTRL+B+Q while keeping the window open and select OK at the bottom of the product information page to begin.
In case you track inventory in your QuickBooks Desktop:
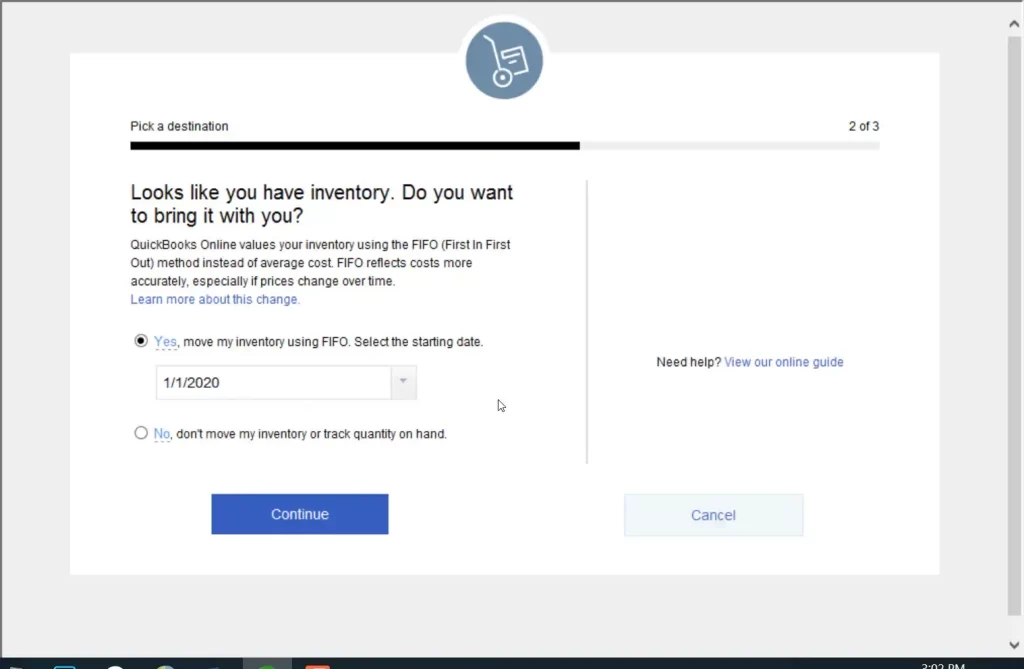
- Click Yes to bring the inventory and specify the starting date.
- Select NO If you want to set up a new item instead of converting QuickBooks Desktop to Online.
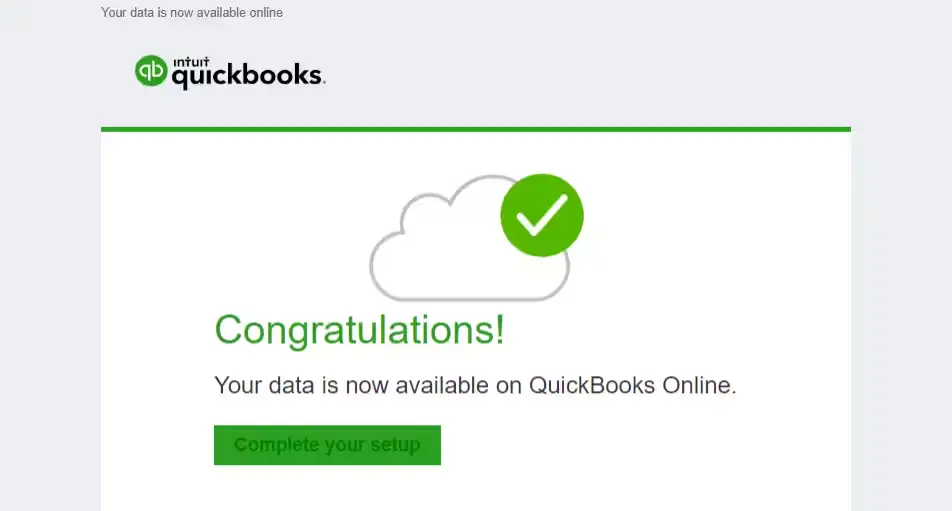
- Once this conversion is complete, you will receive an email. Click on the Complete your setup button in the email.
- Now, sign in to your QuickBooks Online account.
- Finally, choose your company file you would like to open.
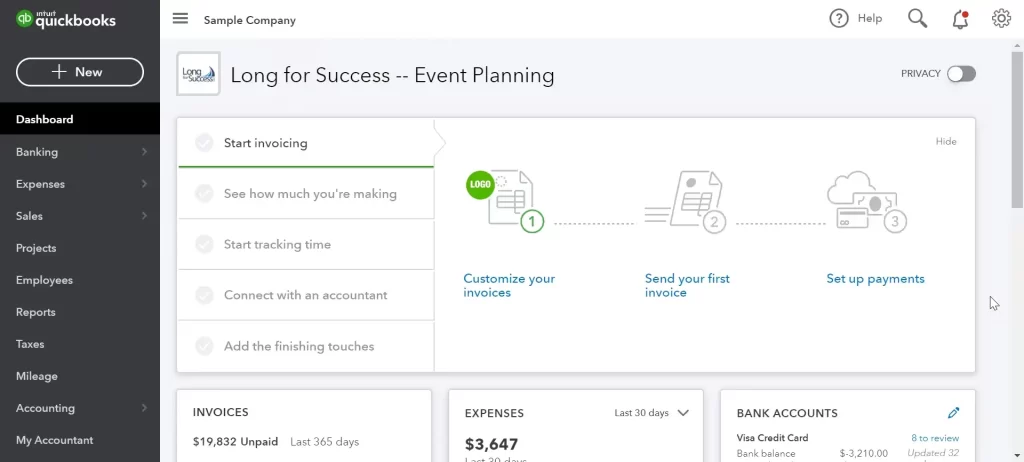
The QuickBooks Online dashboard will open.
3. Move your lists
In order to import your lists into QuickBooks Online, you first exported them from QuickBooks Desktop. Every list type necessitates an own set of procedures. Select a list below to see the import instructions for converting QuickBooks Desktop to Online.
a. Chart of Accounts
To organize your accounting data, QuickBooks uses charts of accounts. When setting up your company, QuickBooks customizes your chart of accounts for you. Instead of entering your accounts manually, you can import your existing accounts from a custom accounts spreadsheet or another QuickBooks Online or desktop company file.
i. Format your spreadsheet
Import your chart of accounts using Excel CSV files. Let’s learn how to format the spreadsheet to facilitate import into QuickBooks:
- Open any existing spreadsheet of charts of accounts or create a new one. You can also export files from different companies.
- Make sure the spreadsheet has these columns:
- Account Name
- Type
- Detail Type
- Number
- Add an Account Number column if you organize the spreadsheet with the account numbers; you may skip this if not.
- If you have sub accounts, use this format: Main account: subaccount. For example, Utilities: Gas. For more examples, see the table below on how to format subaccounts.
Here’s how your spreadsheet must look:
| Account Number | Account Name | Type | Detail type |
| 112720 | TD Canada Trust | Bank | Chequing |
| 234325 | Cash | Bank | Cash |
| 3445 | Property Plant & Equipment | Property Plant & Equipment | Other fixed assets |
| 1123 | Property Plant & Equipment:Computer Equipment | Property Plant & Equipment | Other fixed assets |
| Cost of Materials | Cost of Sales | Materials |
ii. Upload your spreadsheet
- Sign in to your QuickBooks Online.
- Navigate to Settings and click on Import Data.
- Hit on Charts of Accounts.
- Click Browse and select the file to upload from your computer.
- When everything is done, select Open.
- Finally, click Next.
iii. Map your spreadsheet fields to QuickBooks fields
After you upload your spreadsheet, make sure to map your accounts correctly:
- Match the names to the QuickBooks Online field in the Your Field ▼ dropdown for: – Detail Type – Account Name – Account number – Type
- Except for the Account Name, you can select No Match if there’s a field that doesn’t have a matching column in your spreadsheet. For example, if you don’t use your account numbers,
- Click Next.
iv. Import your chart of accounts
You’re all done. Review everything last time before importing your accounts.
- If you haven’t yet, be sure to add your account and its type details.
| Tip: First, focus on getting the account type right. Then, choose the detail types that best suit the transactions you want to track. |
- If one of your field is highlitghed in red, hover over that field and review the inf and see what needs to be changed.
- Uncheck the option for your account that you don’t want to save.
- If everything seems fine, select Import.
v. Enter opening balances for accounts
You must enter your bank, credit card, and other account opening amounts after all of your accounts are in QuickBooks. The account you create in QuickBooks starts with an opening balance. Here’s how to enter your opening balance:
- Select Charts of Accounts from the Settings menu.
- Look for a bank or credit card account.
- Click Edit from the Action drop-down.
- Select the date when you want to start tracking your finances. Enter the amount in an account and determine the as of date in the Balance field.
- Finally, click on Save and Close.
| Note: If a transaction has already been allocated to the account, you must record a journal entry for the opening balance. |
b. Products and Services
Importing your products and services spreadsheet into QuickBooks can save you time. Let’s look at how to format your spreadsheet in Excel or CSV and import it directly into QuickBooks:
i. Format your spreadsheet
You can create a spreadsheet of your products and services in Excel or CSV. Our sample file shows you how to format your spreadsheet so it imports correctly. Here’s how to download the sample file and formatting tips:
- Sign in to your QuickBooks Online.
- Select the Settings icon and then choose Import data.
- Hit on Products and Services.
- Tap on Download a sample file and open the file.
Formatting tips:
- Product/Service Name: 100 character limit. Avoid special characters. See the approved characters list for more info.
- Income Account: You can’t use subaccounts.
- Quantity as-of Date: Format like this: MM/DD/YYYY or DD/MM/YYYY
- Income and Expense account: You can’t use subaccounts.
ii. Import your products and services
Once you’ve prepared your spreadsheet with your products and services in Excel or CSV, you’re all set to import them into QuickBooks Online. Also, remember that once you import a list, you can’t undo it, and you can only import 1,000 rows at a time. If you have a longer list than recommended, split it into several smaller files.
Let’s learn how to import your files:
- Sign in to your QuickBooks Online.
- Navigate to Settings and then select Import data.
- Choose Products and Services.
- Click Browse to upload an Excel or CSV file from your computer. Now, choose your file and then select Open.
- Further, tap on Next.
- Map your information. Here, the field represents the headers on your spreadsheet. Select the one that matches the same Field in QuickBooks Online from each dropdown menu.
- Then, hit on Next.
- If some cells are highlighted in red, it means those cells are invalid. Review these cells in your spreadsheet and try to import them again.
- Choose Overwrite all values for each product or service that has an identical name to replace details of existing items in your account. Review and ensure everything seems fine, as you can’t undo this.
- Finally, click on Import.
iii. Import products and services with sub-categories
You must format your entire spreadsheet specifically to import your lists, but only if you use sub-categories. The sample spreadsheet has a variety of examples; you must look out for references.
Use the following formats in the products/services field on your file:
For categories only: [Name of category]:[Name of product/service]
| Product/Service name |
| Large: T-shirt |
| Medium: T-shirt |
| Small: T-shirt |
For categories and sub-categories: [Name of category]:[Name of sub-category]:[Name of product/service]
| Product/Service name |
| Large: Red: T-shirt |
| Large: Yellow: T-shirt |
| Medium: Red: T-shirt |
| Medium: Yellow: T-shirt |
| Small: Red :T-shirt |
| Small: Yellow: T-shirt |
c. Customer and Supplier
Do you have a customer or supplier list that you want to bring into QuickBooks Online? This section will be exploring how you can export your list as a spreadsheet from Outlook, Gmail, or Excel. Let’s take a look and learn how to import them directly into QuickBooks:
i. Export contacts from Outlook
- Go to the File menu and select Open and Export and Import/Export.
- Select Export to a file in the Import and Export wizard to a file and choose Comma Separated Values for the type.
- Choose the folder where you will keep your customer contact information, adhere to the on-screen instructions to save the export file, and note where you will save the file.
ii. Export contacts from Gmail
- Sign in to your Gmail account.
- Choose Google Apps and then click on Contacts.
- Hit on Export.
- Choose the group you want to export or all the contacts.
- Select the format, such as Outlook CSV or Google CSV, and click on Export.
- Choose the location to save your company file and click OK.
iii. Verify the exported file
Before importing your contacts, you must review the information and needs to make sure everything is fine. In case your import has any issues or mistakes, it can be a lengthy process to manually correct or remove your imported contacts.
- Open the CSV or XLSX file you saved and review them for accuracy.
- Double-check that your spreadsheet column headings in row 1 match the sample spreadsheet above.
- Review the contacts, enter any missing information, and fix any mistakes.
- Ensure the file does not exceed the 2MB or 1000 line limit. If it does, divide it into multiple import files.
4. Set up inventory
Turn on the inventory tracking in QuickBooks Online by following the below steps before converting QuickBooks Desktop to Online:
- Navigate to Settings and click on Account and Settings.
- Choose Sales.
- Click on Edit in the Products and services section.
- Now, enable Show Product/Service column on sales forms.
- Also, turn on both Track quantity and price/rate and Track inventory quantity on hand.
- Hit on Save and click Done.
QuickBooks Online uses the First-in-First-Out (FIFO) approach to determine inventory expenses starting on the inventory start date. On or after this date, all current transactions are also recalculated using FIFO. To avoid filing revised forms, we advise using the first day after your company’s most recent tax filing period.
| Note: Choose No during setup if you would rather not use FIFO or activate inventory in QuickBooks Online. You should also avoid tracking quantity on hand and turning on inventory. You will have to set up new inventory items if you decide to alter these settings later. If you need assistance making this choice, we advise that you contact a tax expert. |
Use the instructions in our article to add inventory products to QuickBooks Online. Once you’re set up, adding products to sales forms and tracking inventory in QuickBooks are simple. You don’t have to because QuickBooks refreshes the quantity on hand while you work.
What to do after you migrate
After converting QuickBooks Desktop to Online, you still need to perform a few tasks before you can get started with QuickBooks Online. We recommend completing these as soon as possible before making any changes to data or entering new transactions.
Follow the steps below to ensure your data is transferred as you expect and to import information not included in the migration.
1. Compare your reports
Once the migration is successful, you need to compare reports in QuickBooks Online and QuickBooks Desktop to make sure your data was transferred correctly and there is no loss or corruption:
- Balance Sheet Report
- Trial Balance – All Dates
- Customer Balance Summary – All Dates
- Supplier Balance Summary – All Dates
- Sales Tax Summary Report for the most recent period
- Any other reports you’d like to check
To verify your reports, run them by “All Dates” and configure your accounting method to Accrual in both QuickBooks Online and QuickBooks Desktop.
2. Configure your company settings
Although you can easily transfer your accounting data to QuickBooks Online, the conversion will not include information such as company name, address, and email details. You must enter this information manually by following the below steps after converting QuickBooks Desktop to Online:
- Click on the Gear (Settings) icon and choose Account and settings.
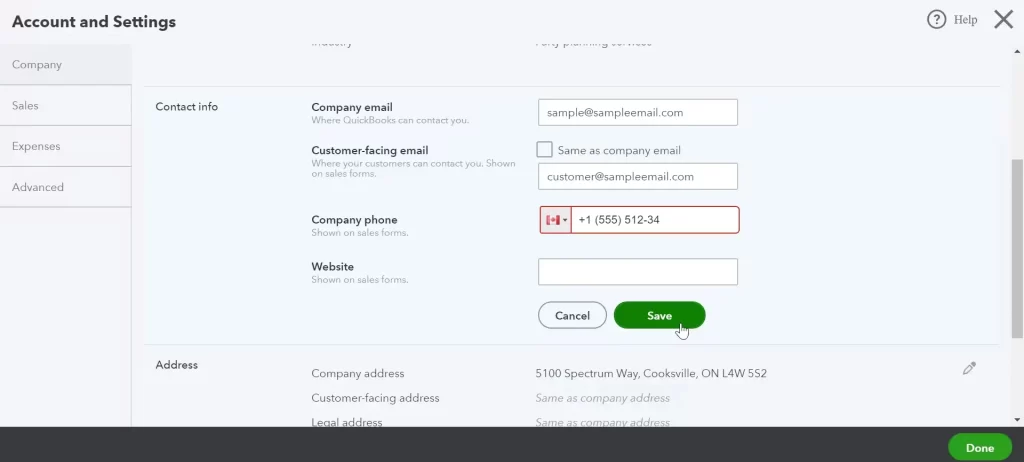
- Move to the Company tab and enter your company and contact information.
- In the Company email box, enter the email address where you would like to receive Intuit’s monthly invoices for your QuickBooks Online subscription.
- If you don’t want your customers to use the company email address to contact you, enter the email address in the Customer-facing email box.
- Click on Save.
3. Configure your sales tax settings
Before you get started, you’ll need to set up your QuickBooks Online with an accurate CRA business number and filing frequency. If your business is not registered for sales tax, you can skip the steps below:
- Navigate to Taxes and choose Sales tax.
- Hit on the Set up sales tax button.
- Select the province or territory you live in and click Save.
- On the prompted screen, fill in the required information and choose Next.
- Further, click OK on the next screen.
- Move back and make the changes in the settings at any time.
4. Connect bank and credit card accounts
Let’s connect your bank or credit card with your QuickBooks Online account:
- Navigate to Bookkeeping and choose Transactions.
- Click on Bank transactions.
- Choose Connect Account from the landing page, or click on Add account if you’ve already created an account.
- Find your bank and select Continue.
- Continue, then enter the username and password you use for your bank’s website in the pop-up window.
- Finally, choose the accounts you want to connect.
5. Clean up bank reconciliations
Since you are new to QuickBooks Online and have not yet performed reconciliation, no bank transactions have been reconciled. You must mark all transactions up to the conversion date as reconciled so QuickBooks Online considers only future transactions as reconcilable.
- Click on the Settings icon at the top and choose Reconcile.
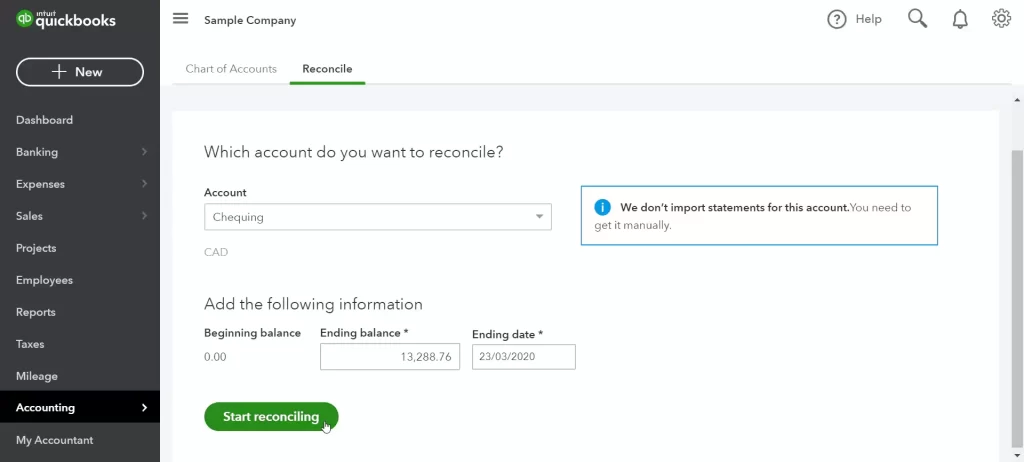
- Select your bank preferred bank account from the drop-down menu and enter the Ending balance and Ending date, then tap on Reconcile now.
- You will see a list of transactions. Now, choose the top checkmark boxes to select all the transactions in the list. If you see the data in two different columns, make suer you have selected all of them.
- Look for the transactions that are not cleared and unmark them. If you see the difference is zero, it means you have completed the reconciliation successfully.
- Click on Finish now.
- When everything is done, repeat the above steps to reconcile each of the accounts you connected with QuickBooks Online.
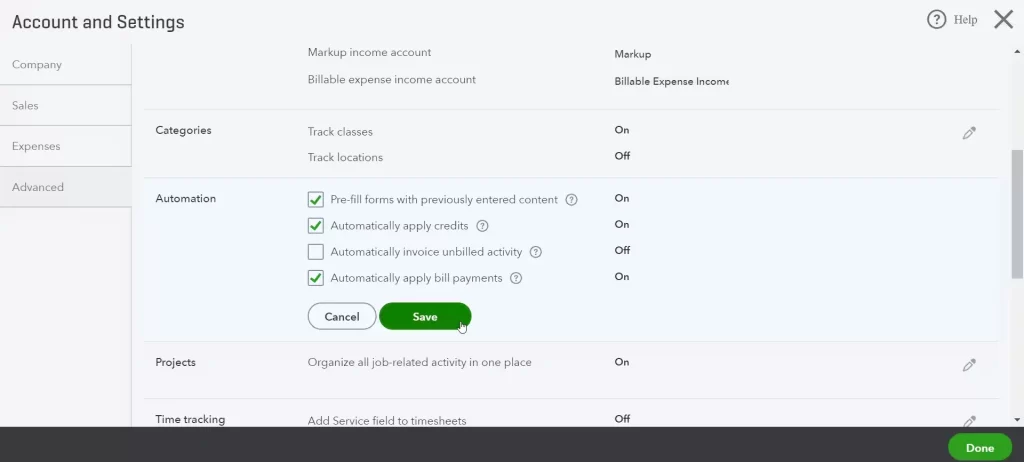
6. Link payments and credits to open invoices
Now that all your transactions are downloaded into QuickBooks Online and you haven’t linked invoices to their corresponding payments, you may find zero balances in your A/R and A/P Aging reports. To automatically apply your credit card preferences, you must link credit cards and payments to open invoices by following the steps below:
- From the top right menu bar, click on the Settings icon.
- Choose Account and settings.
- Move to the Advanced tab and select Automatically apply credit card, then Save.
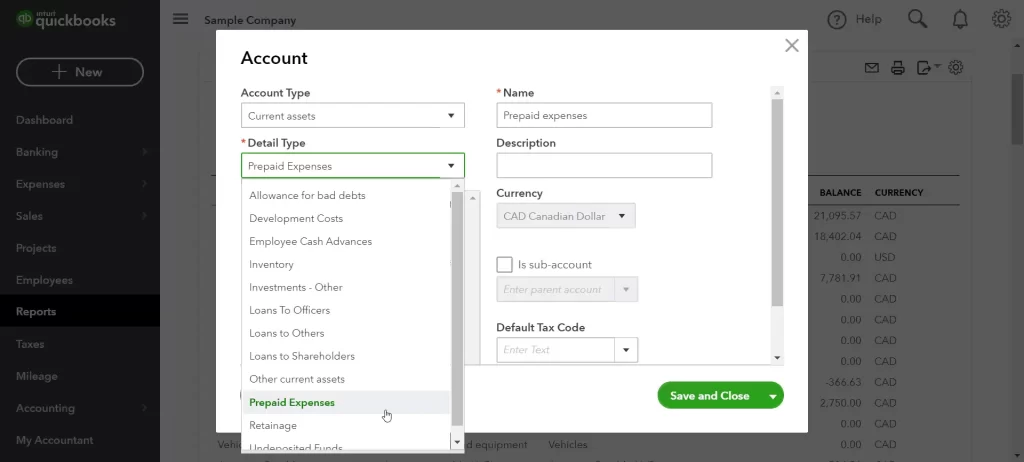
7. Review your accounts’ detail types
QuickBooks Online maintains the sub-account hierarchy, and it does so after the conversion. However, it uses a higher level of account typing called a detail type. Detail types allow you to be more specific with your account organization.
After the conversion, QuickBooks Online assigns detail types to accounts where the detail is obvious. In case you have an account that isn’t clear what the detail type must be, the conversion process assigns a generic detail type, such as Other Miscellaneous Income. If so, you must correct it now.
To review and edit your accounts’ detail type, you must Run the Account Listing Report:
- Go to Business Overview and select Reports from the left pane.
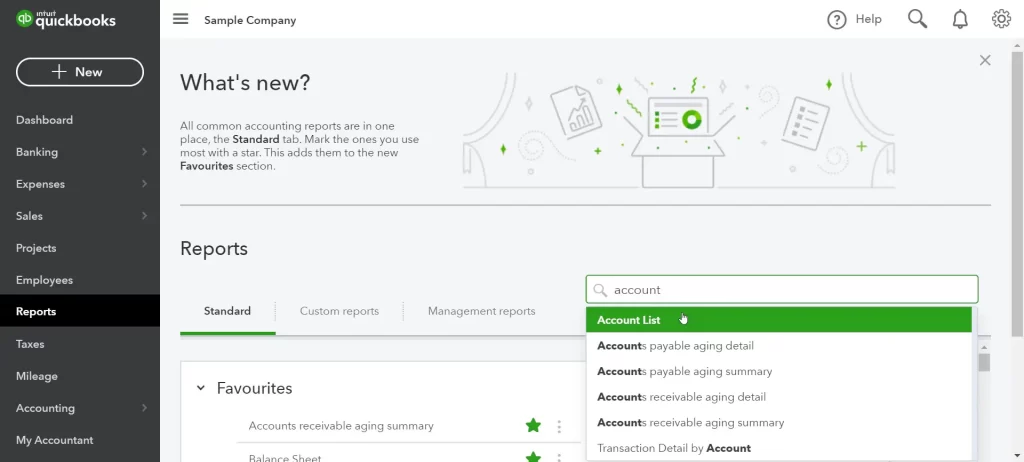
- Further, look for the Account List report and open it.
- Review each of your accounts.
- Choose the account name to edit the detail type of your account.
- Select the accurate detail type from the Detail Type drop-down menu.
- Finally, select Save and close.
8. Complete payroll setup
After converting QuickBooks Desktop to Online, you can convert your transactions and payroll accounts into your books, but the details behind the transactions, such as payroll item breakdowns, employee year-to-date numbers, and other information, won’t be converted.
Many things affect the accounts conversion to journal entries; Liability refunds, adjustment transactions, and opening balance transactions
You must complete your payroll so manually make sure the information is accurate:
- Select Employees from the Payroll menu.
- Make sure each oif employee who receieved a pay cheque this year is switched to Yes in the Paid in [Year] column. Employees who aren’t paid in the curent year wil be automatcially listed as No.
- To enter or verify your employees year-to-date payroll totals and their information, click on Complete payroll setup.
- Follow the instructions displayed on your screen to complete the process.
- Ready to pay your employees? Use Run Payroll to do so.
If your QuickBooks Desktop pay types are not mapped to a standard QuickBooks Online pay type, you may be asked to manually match your payroll items. Follow the steps below to map your QuickBooks Desktop pay types to QuickBooks Online:
- In the QuickBooks Online column, select the (Choose one) drop-down menu.
- Choose the pay type that nearly matches the setup within the QuickBooks Desktop file.
- To make sure the payment type matches, we recommend checking your QuickBooks Desktop file and seeing how your items are set up.
- Finally, click on Save and close.
- Perform the above steps for each payroll item to map and select Continue.
Couldn’t find options to choose from? Some pay types that are imported are not supported in QuickBooks Online. In such a case, click on Skip at the bottom right of your screen for now. Keep in mind you cannot move back to map your pay types if you select Skip for now. You will need to manually create pay types for your employees to complete the payroll setup.
9. Link your Payments account
You can create a new account if you can’t transfer your existing payment account to QuickBooks Online. Follow the steps below to enable payments in QuickBooks Online:
- Select the Settings icon from the top right corner and click on Account and settings.
- Hit on Payments. Now, choose Learn more in the QuickBooks Payments section.
- Choose Set up Payments. This will open the signup window with three sections.
- In the Business section, tap on Start.
- Now, click on Add a new bank connection and search for your bank.
- Find the account you want customer payments to go into and select it.
- Enter the sign-in credentials to sign in to your bank and click Connect.
- When you’re done with all of the sections, select Activate Payments.
10. Add users
You can add users to your QuickBooks Online to help with company operations and bookkeeping. Make sure these users have the right permissions. Select the Settings icon to check your current users, and then go to Manage Users.
Need to add additional users? Here’s how:
- Select the Settings icon from the menu bar and click on Manage users.
- Then, click on Add user.
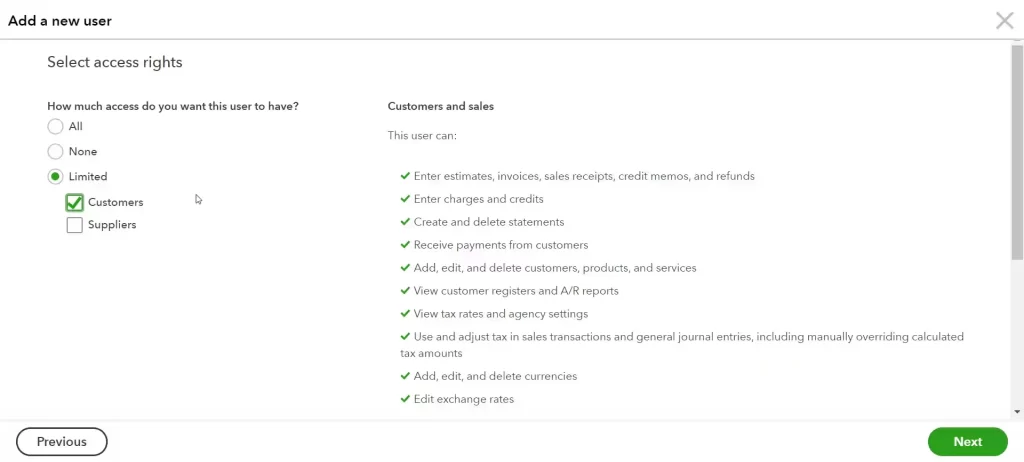
- Choose the user type you want to create. Depending on your selection, you will see more options displayed on the screen.
- Now, enter the user’s name and your email address.
- Then, select Save.
After completing these steps, the user you just added will receive an email from QuickBooks. Ask them to click on the link, which will take them to a sign-in or account creation page.
11. Invite an accountant
In QuickBooks Online, you can invite up to two accountants to work on your company file. To see how you can invite an accountant, follow the steps below:
- Navigate to Bookkeeping and select My accountant.
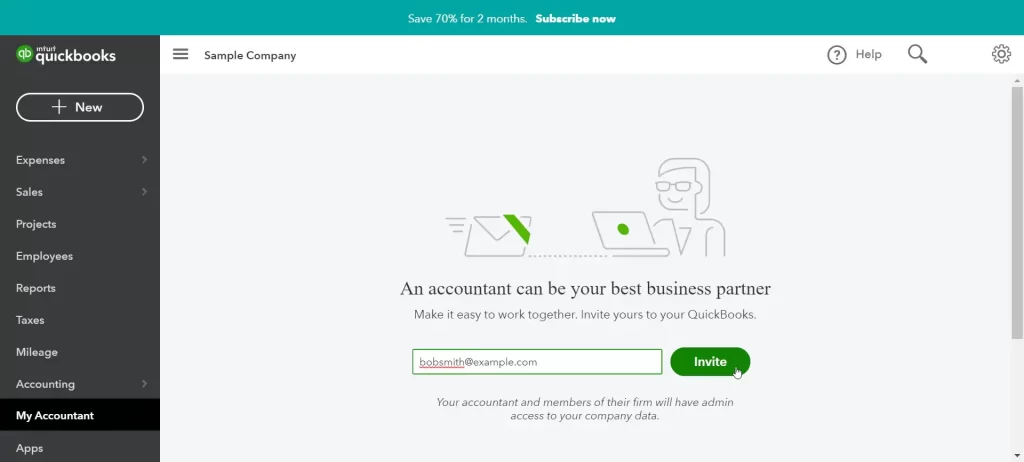
- Now, enter your accountant’s email address and click on Invite or,
- Go to Settings and click on Manage Users.
- Further, choose Accounting firms.
- Hit on Invite.
- Enter all the required information in the fields and select Save.
Get Started with QuickBooks Online
Now, you are all set to start accounting and bookkeeping management in QuickBooks Online. Explore its features and functions and manage your business.
Have further queries to ask? We recommend you to connecting with QuickBooks professionals!
Summary
QuickBooks Online is preferred by businesses that focus on real-time collaboration and better access to their accounting data. If you use QuickBooks Desktop and are thinking of moving to the online version, then this blog is enough for you. From determining if you are suitable to move, data preparations, how to migrate, and post-migration steps to complete setup for converting QuickBooks Desktop to Online, we have covered everything in this detailed article.
For more help, we recommend consulting the team of QuickBooks professionals and enjoy guidance at each step. Dial +1-866-409-5111 and talk to an expert now!
Frequently Asked Questions
Yes, Intuit allows you to converting QuickBooks Desktop to Online with its internal tools for data migration. Before you get started, you must determine whether you want to move to the online version based on the company file size.
What if it’s been more than 60 days since you signed in to QuickBooks Online, and you haven’t moved your data yet? Don’t worry; you still have options to move your data. Start a new QuickBooks Online subscription and use the Data Conversion Tool to upload the desktop file to the QB Online version. This resets the 60-day period.
Switching from QuickBooks Desktop to Online doesn’t cost anything except for the QB Online subscription, and you can outsource an expert to do the migration for you. Simply put, Intuit doesn’t charge anything if you move to QuickBooks Online for accounting and business management.
Nothing really changes; Intuit simply copies your data from the desktop version to the online one using its internal migration tool. You will still keep the QuickBooks Desktop company file with your data but can only access this data with an active QuickBooks Desktop subscription.
QuickBooks Desktop is a software application that needs to be downloaded on the software and can be accessed even without an active internet connection. Meanwhile, QuickBooks Online is the web version of QuickBooks that does not require you to get the application but rather ensures that you have a stable internet connection to open it and run the operations.
About The Author