Running multiple companies or businesses lets you cover a broad range of products and services in different locations or even internationally. As QuickBooks is your primary accounting and financial management software, wondering about setting up other companies is common.
QuickBooks Online understands the complexity of managing companies and the importance of increasing efficiencies, thus allowing you to set up and manage up to 99 companies under a single Intuit account but with different subscription. This makes it convenient to move from one company to another and even share the data between existing companies.
If you already have an existing company and are wondering how to create a new company in QuickBooks Online or manage it under a single account, this guide has your back. Read this detailed guide until the end and make it convenient to manage multiple businesses.
Have multiple businesses to take care of and are wondering how to manage them in QuickBooks Online? Don’t worry; talk to our QuickBooks support team at +1-866-409-5111 and let them create and set up a new company for you!
Can I Manage Multiple Businesses in QuickBooks Online?
Yes, you can manage multiple businesses, but you must obtain a license from QuickBooks Online for each business you want to manage.
In QuickBooks Online, you can only have one company file per account or company ID. You must choose a new license to create a new company file for your different business. However, you can have different company files and licenses under the same Intuit account.
You can easily move from one business to another and set it up and add your employee or customer information, helping you reduce complexity, increase efficiencies, and empower your teams.
Read More- Step-by-Step Guide for QuickBooks Online Bank Reconciliation
Create or Add a New Company to the QuickBooks Online Account
In QuickBooks Online, you can create and manage up to 99 separate business accounts, with each software license under one Intuit account.
Let’s learn how to run multiple companies under a single Intuit account and how to create a new company file in QuickBooks online:
| Note: If you want to create a copy of an existing QuickBooks Online company file and start it as a new one, you must upgrade the subscription to QuickBooks Online Advanced and then set it up, as this isn’t included in your current subscription to QuickBooks Online |
Move existing company files to same account
Managing multiple companies under different Intuit accounts is quite complicated, as you have to remember and use credentials every time you log in to a different company. In QuickBooks Online, you can transfer them all to one Intuit account, making it more convenient.
Let’s learn how to transfer multiple companies to one Intuit account:
a. Send an invite
Let’s send an invite to the email address your Intuit account is registered with to access all your companies with. We will call this email “A” and the email you longer need will be marked as email “B.”
| Important Note: Only a company admin has the authority to share an invite. Ensure you already have an existing Intuit account with email A to manage different companies if you don’t create and set up a new one. |
- Sign in to one of your QuickBooks Online companies that is registered with email B.
- Now, invite email A to the same company. – In QB Online, go to Settings and click on Manage Users. – Select Add user and then enter the email address and user name for an invite. – Choose the role you want to assign to the user from the Roles drop-down. – Click on the Account management settings you want to manage. – Finally, select Send invitation.
| Note: If you see the user limit message, it’s because the maximum number of users in QuickBooks Online depends on your subscription. |
- Choose a user type based on the role. Select Admin if you want email A to manage other users and your company information.
- Check your inbox for email A. Then, choose the link you received to accept the invite.
You are all set to sign in using email A and can simply move to other companies.
b. Change the primary admin and remove email B
Now you can access your company file using email A and can set it as the primary admin as well. The primary admin has control of everything and manages other users in your company.
In case you don’t want to use email B anymore and shared all the roles to email A, you can easily remove it from your company. This makes space to add another user in future or to share the roles in the company.
Learn More- Learn How to Turn Off Notifications in QuickBooks Online
Adding a new company
Once done with moving all your companies under one Intuit account, you are set up to manage the business at one time in QuickBooks. If there’s another company you want to add, learn how to create a new company in QuickBooks Online.
Check out the QuickBooks Online pricing page and choose the subscription you want to opt for. This will open one of two experiences:
- If you already sign in to QuickBooks, you will be asked to confirm the account you want to use. Mostly the account will display on your screen and will be the one you want to use for the new company file. To select the same, click Yes, that’s correct.
- If you haven’t signed in recently, or the account or QuickBooks doesn’t remember the email to which you want to add a company file, you will need to create a new Intuit account. Don’t add the information until you connect your new company file to a new account. Instead, move to the Adding a company to an existing account? section and click on the Sign in link. Now, use the user ID and password to sing in you already use for QuickBooks.
Finally, follow the instructions displayed on your screen to create a new company file.
Read Here- QuickBooks Alt Key Suppress Error: An Unrecoverable Error
Easily switch between company files
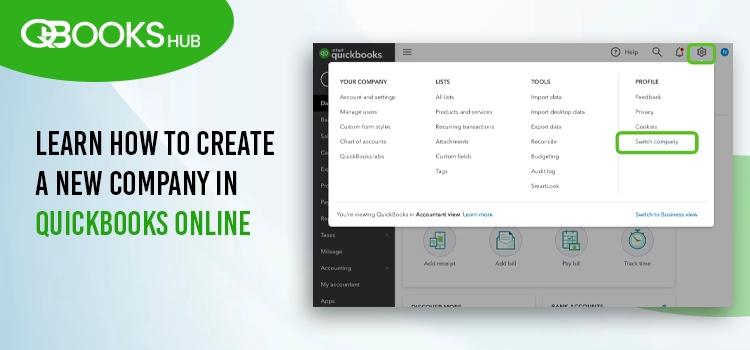
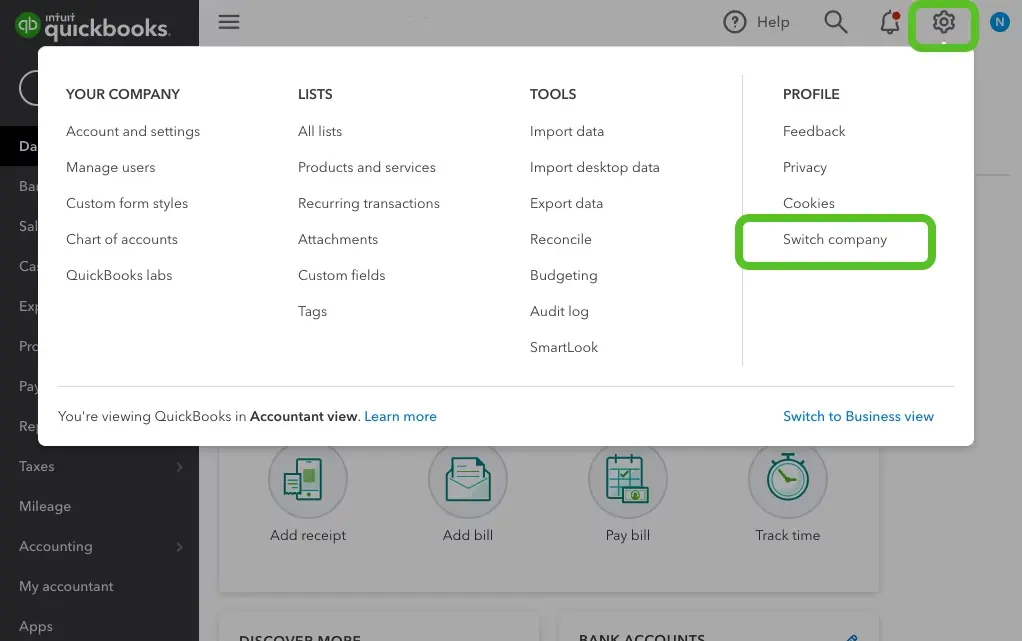
Whenever you sign in, QuickBooks will ask you which company file you want to sign in to. To switch between companies while being in QuickBooks, click on the Settings gear icon and select Switch company.
Learn More About Managing Multiple Companies in QuickBooks Online
Although you switch between multiple companies you have set up, they are still separate and must manage your data accordingly. Here are a few things you must do to manage all the data in your company files separately:
Users
Users set up for one compoany aren’t automatically set up or granted access for the other one. You will need users manually or can simply give them access by inviting them to your new company file.
Online banking
If you have connected a bank or credit card account to one company, it isn’t added or visible from the second one. Connect the bank account or credit card separately for each company registered with the Intuit account.
Lists
You can easily move your lists such as vendors, customers, inventory and chart of accounts to your new company, ensuring that you don’t have to start from scratch.
Also, remember that your companies are kept for a reason, such as keeping your one business info to merge with the other one. And, any changes you make in the future to a list in a company or other info won’t updated in another company’s list.
Summary
Having multiple companies in QuickBooks Online under one Intuit account allows you to easily move from one company to another. It lets you set up and manage multiple businesses in one place. Above, we have discussed the stepwise instructions on how to create a new company in QuickBooks Online and covered all the related information.
If you fail to add another company file to QuickBooks Online or get stuck somewhere and seek professional help, connecting with QB professionals is recommended. Dial +1-866-409-5111 to talk to a QuickBooks ProAdvsior now!
Frequently Asked Questions
Let’s learn how to create a new company file in QuickBooks Enterprise:
-
Launch QB Desktop Enterprise.
-
Click on Create a new company in the No Open Company window.
-
Now, you will see two setup options on your screen:
– Choose Express Start or Start Setup to get started. Enter your business name, industry, and business type and tap on Create Company File to create your new company. Enter other information later.
– Select Detailed Start to complete the setup so all of your info is in from the start.
-
Adehre to the onscreen steps to finish the setup.
-
Finally, select Start Working.
Yes, QuickBooks Online allows its users to create and manage around 99 separate companies with the same Intuit account. This provides you to manage the business globally with the single QuickBooks software.
Yes, you can calear the existing company file data in QuickBooks and start with a new QuickBooks Online company.
Here’s how to restore a backup copy of your company file in QuickBooks
-
Go to File> Open or Restore Company> Restore a backup copy and then Next.
-
Choose Local Backup and then click Next.
-
Browse your computer for the backup company file: [Your company name].qbb.
-
Select the company file folder to save the restored company file and click Open.
-
To avoid overwriting your data, rename the existing company file or save the backup copy with a different name.
-
Once done, click Save.
The ability to merge two company file data into one company is not available in Quickbooks Online. Each company you create has a separate company file and can’t be managed; you can manually input the data.
About The Author