How to Get Started with QuickBooks Database Server Manager?
QuickBooks Database Server Manager lets you share your company files with other computers over the network for a multi-user setup. You must set up and run QuickBooks Database Server Manager when you set up this network to give access to other users. The tool also lets you monitor your drives and the multi-user network. You must be wondering how to download and install QuickBooks Database Server Manager for these benefits.
Below, we have mentioned how you get the Database Server Manager tool, how you can configure it and the steps to scan your company file folders to get started with a multi-user setup to work together in a single company file. Let’s get started with this blog..
| Rather following this extensive guide to get Database Server Manager, you can gate in touch with QuickBooks experts and let them handle the installation and sharing the file over the network using QBDSM. Dial +1-866-409-5111 now! |
Download and Install QuickBooks Database Server Manager
QuickBooks Database Server Manager is a part of QuickBooks program file which downloads automatically when downloading or updating the program.
To install your Database Server manager, follow the steps mentioned below:
| Important Note: If you are an accountant or someone who works with multiple versions of QuickBooks Desktop, you must install them in order. First, install the older version of Server Manager and end with the most recent one. |
- Exit all the open programs on your server computer even QuickBooks.
- Look for the installation file; Setup_QuickBooks.exe in QuickBooks file folder.
- Follow the on-screen instructions for installation. Also, keep your product and license number handy.
- Now, QuickBooks will ask you to choose the installation type, choose Custom and Network Options.
- Select Next.
| Note: Do not select Express Install. It will install QuickBooks Desktop over the previous version of QuickBooks which you might need for your business preferences. |
- Now, choose the option that suits you best for network setup and hit Next. And don’t worry is QuickBooks is already installed on your server computer as it won’t overwrite any existing data. – If you will be using QuickBooks and Database Server Manager on the same computer, select I’ll be using QuickBooks Desktop on this computer, AND I’ll be storing our company file here so it can be shared over out network. It is strongly recommended to choose this option. – If you only want to use QuickBooks Database Server Manager on server computer, select I will NOT be using QuickBooks Desktop on this computer.
- Adhere to the remaining on-screen instructions and click Install. Before installation Windows may ask for the admin permissions.
| Note: For each version of Database Server Manager, QuickBooks automatically creates a new Windows user. For example, you will see Database Server Manager 2023 as QBDataServiceUser33. Ensure you granted the required permissions to QBDataServiceUserXX (XX is the user number) to access your company files folder. You might see these users when setting up the system-level permissions. |
Once Installed, Configure Database Server Manager
If you want to set up QuickBooks Database Server Manager for default settings, follow the below steps:
- Launch the Windows Start menu on your server computer.
- Type Services in the search field and press Enter.
- Now, select QuickBooksDBXX (XX denotes the QB version) and open it.
- Go to the General tab and look for Service status. Select Stop if the service is Running or Started.
- Choose Automatic for Startup type.
- Move to Logon and hit on Local System account.
- Now, go to the Recovery tab and Restart the Service for each of these: First failure, Second failure, and Subsequent failures.
- Move back to the General and choose Start to restart Database Server Manager.
Note: Configure the Windows Firewall settings.
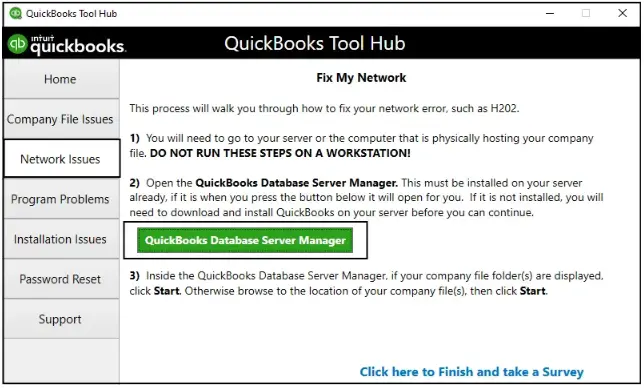
Run QuickBooks Database Server Manager,
You need to scan your company files after installing Database Server Manager to host them on the network so other computers can easily access them. This lets you and others on your network work simultaneously in QuickBooks Desktop from multiple computers.
Step 1: Scan Your Company Files and Folders
Scan the folders using QuickBooks Database Server Manager
- Open the Windows Start menu on your server computer (that hosts your company file).
- Type Database in the search field and select QuickBooks Database Server Manager.
- Navigate to the Scan Folders tab.
- Hit on Browse and then choose the QuickBooks company file folders.
- Click OK.
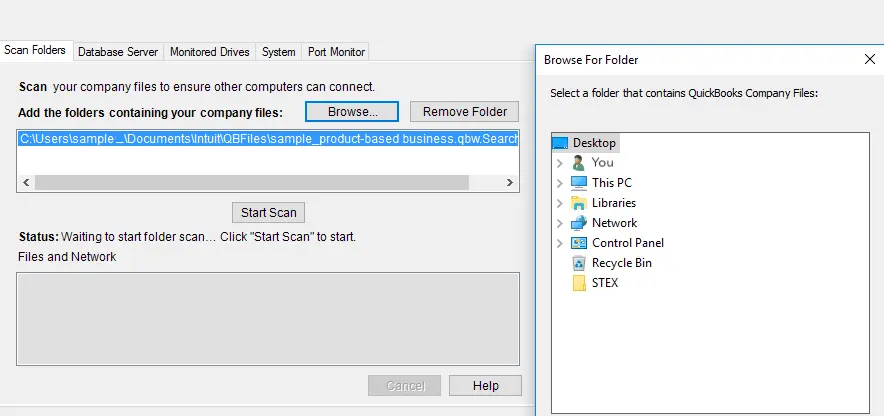
- Once you’re ready, tap on Start Scan.
You will the company file folders in the QuickBooks company files found section after the scan. Now, you can also access these folders from workstations linked with the server on your network.
Learn More- Stay Updated with the QuickBooks Tool Hub – Version 1.6.0.8
Step 2: Monitor Your Drives
You must monitor the folders after you scan the file folders to avoid rescanning them if you ever change or move the company files in them.
After the scan, your folders will show up in the Monitored Drives tab. Choose the drive to monitor these folders:
- Click on the Monitored Drives tab.
- From the drive list, select the checkbox for the hard drives where your company files are saved.
| Note: Only add the drives that holds your company file. |
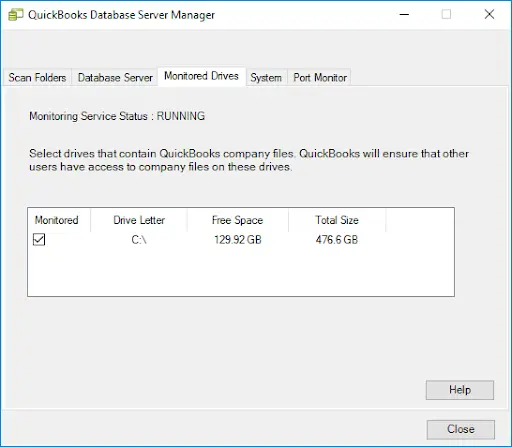
| Note: Mapped drive cannot be monitored. |
Step 3: Manage the QB Database Server Manager
You will see other tabs in QB Database Server Manager that ensures everything is running smoothly.
- System tab: You can checks where you have installed Database Server Manager on your computer under the System tab.
- Database Server tab: Get the real-time update of the tool and see who’s connected under the Database Server tab.
Conclusion
We’ve covered the essential steps to install, configure, and start using QuickBooks Database Server Manager, enabling seamless sharing of company files across a multi-user network. By following the instructions provided, you can efficiently collaborate with your team.
If you encounter any issues or need expert guidance, don’t hesitate to contact QuickBooks support professionals. Reach out today for prompt assistance!
Frequently Asked Questions
QuickBooks Database Server Manager allows multiple users on a network to access the same company file at the same time. It helps you configure hosting settings and ensure a seamless experience.
QB Database Server Manager is a component of the QuickBooks program file and you do not need to download it separately. To get started with Server Manager, all you have to do is install the software from the file and set it up on the network.
QuickBooks error H202 typically occurs when QuickBooks can’t connect to the server hosting your company file in multi-user mode. This may also happen when you are not running the QuickBooks Database Server Manager or when there are incorrect hosting settings.
QBDBMgrN is a QuickBooks Database Server manager service that allow users to access accompany file stored on the server. It runs as a Windows service and is automatically started when the computer boots up.
Yes, QuickBooks Database Server Manager is required when setting up a multi-user network for QuickBooks Desktop. It enables multiple users to access and work with the same company file simultaneously over the network.

