Resolve QuickBooks Error 6143 Using These Simple Methods
The company file in QuickBooks is crucial, storing all financial data essential for business operations, from transactions to reports. QuickBooks error 6143 disrupts this process, preventing access to the company file and halting critical tasks like invoicing or payroll. A warning message appears:
“We’re sorry, but QuickBooks can’t open your company file.”
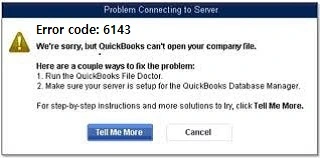
This error can lead to delays, data inaccessibility, and potential workflow disruptions. In this blog, we’ll explore possible causes, troubleshooting steps, and offer solutions to restore seamless access to your company file.
What Triggers QuickBooks Error 6143?
The sudden encounter of QuickBooks data error 6143 when opening or restoring the company file can be triggered due to multiple reasons, which we are discussing below:
- Any data damage or corruption to your QB file.
- Network issues when opening the file on the multi-user environment.
- Missing transactions from your company file.
- Opening or restoring the company file using an outdated version of QB.
- Incorrect company file path.
Read More: QuickBooks Cannot Communicate with the Company File
6 Methods for Troubleshooting QuickBooks Error Code 6143
This section covers the suitable fixes you must adhere to when troubleshooting QuickBooks error code 6143 when restoring a backup or opening the company file. Let’s get started with the stepwise instructions:
1. Get the Most recent Version of QuickBooks
Using an outdated version of QuickBooks Desktop often hinders crucial operations, such as triggering QuickBooks error 6143 when opening or restoring a company file:
- In QuickBooks Desktop, hit on Help at the top menu bar.
- Hit on Update QuickBooks Desktop.
- Click on the Update Now tab in the redirected window.
- Choose the Reset Updates checkbox.
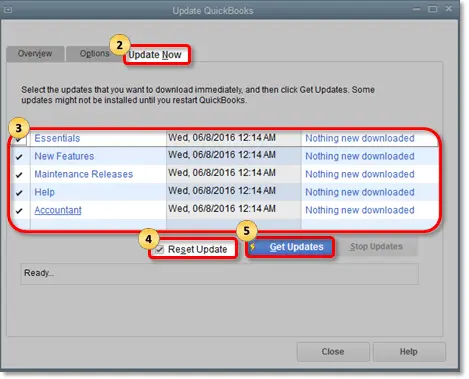
- Select Update Now and wait until the update downloads.
- Once done, reopen QB and click Yes when asked to install.
2. Verify and Rebuild Company File Data
Let’s fix the issues going on with your company file using the Verify and Rebuild Data utility to identify and rebuild the data damages:
a. Verify Your Company File Data
- Close all the open windows in QuickBooks Desktop.
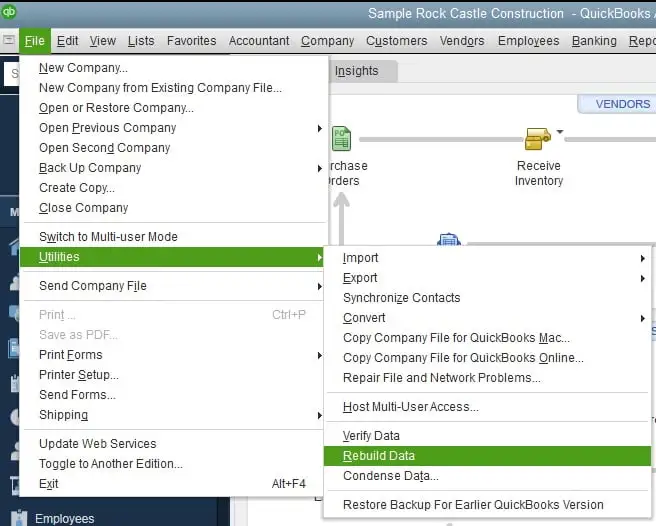
- Hit on the File menu at the top.
- Select Utilities and then Rebuild Data.
- Now, you will see:
- QuickBooks detected no problems with your data– Your data is clean and safe, you don’t need to do anything. – An unknown error message
- Your data has lost integrity– Data damage is found and you need to rebuild the data damages.
b. Rebuilding the Data Damages
- Move back to the File menu.
- Choose Utilities and then Rebuild Data.
- Now, QuickBooks will ask you to create a company file backup, click OK. A backup is needed before rebuilding to ensure your company file data is safe and protected.
- Choose the location where you want to save the backup file, click OK, and ensure you are not replacing an existing company file. Enter a new name in File Name, and then click Save.
- Once you see Rebuild has completed, click Save.
Now, try again to open your company file or create a backup. If you can do so, you’re good to go. However, if QuickBooks error 6143 persists, proceed to the next solution.
Read Also: QuickBooks File Doctor Won’t Open Company File
3. Run QuickBooks File Doctor
The QuickBooks File Doctor ensures there are no network issues when opening a company file and runs a quick repair. To run the utility, you must get the Tool Hub in the most recent version:
- Launch the Tool Hub by double-clicking on its icon.
- Click on Company File Issues.
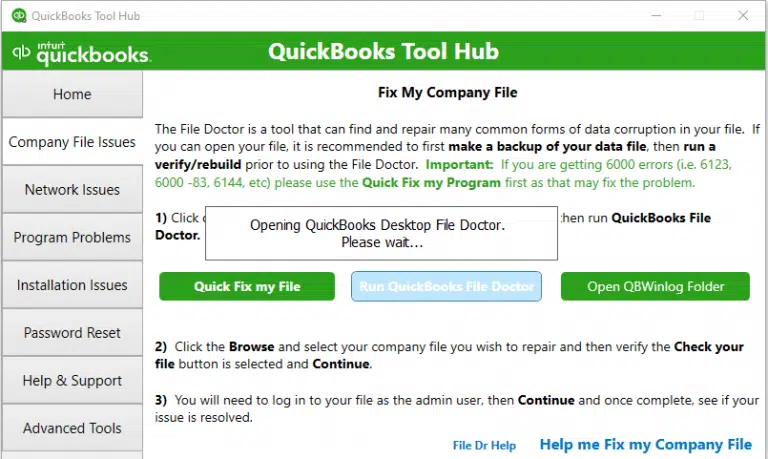
- Hit on the Run QuickBooks File Doctor button. The tool might take up to one minute to open; wait until then.
- Select your company file from the drop-down menu in the QB File Doctor. If you didn’t find the company file, click on Browse and locate the data file.
- Select the middle option as Check your file and then continue.
- Enter the QuickBooks admin password to grant the admin permission and hit Next. The scan time depends on the size of your company file; the larger the data file, the longer it will take. Usually, it takes 10-15 minutes, so wait until then.
4. Restore a Company File Backup
When restoring, QuickBooks Desktop uses the backup file (.qbb) you created to create a new company file or the restored version.
| Note: If you saved the backup company file to an external device like a USB or a hosting service like Box, you must move the file to the local hard drive and then adhere to the below steps. |
- Navigate to the File menu and click on Open or Restore Company.
- Hit on Restore a backup copy and select Next.
- Tap on Local Backup and then Next.
- Now, browse your computer for the backup company file. It will look like [Your company name].qbb.
- Choose the folder where you want to save the restored version of the company file, and then click Open.
| Note: Avoid saving the restored company file to the same folder as your company file, as it may overwrite your data. |
- To avoid such overwriting, ensure that the restored version is named uniquely, or you can rename the existing version of the company file.
- Once you’re done, click Save. If you notice any message about possibly overwriting the data, choose the best option.
5. Create and Open a Portable Company File
Create and use a portable company file if you fail to restore a backup version. A portable company file makes it easier to share or move accounting data around.
Step 1: Update QuickBooks
Ensure you use the most recent of QuickBooks Desktop version for better performance.
Step 2: Create a Company File Backup
A portable company file backup is great for sharing your company file or moving the accounting data around without creating a backup file.
This isn’t a complete replacement for the full backup, as it won’t include the message templates, logos, images, or templates. Also, the portable file won’t include .tlg or .log files, Loan Manager, Statement Writer, or Fixed Asset Manager files.
Thus, create a company file backup manually by following these steps:
- Navigate to the File menu at the top and click on Switch to Single-user Mode.
- Move back to the File menu and hove over to the Backup up Company. Then, click on Create Local Backup.
- Select Local Backup in the window and then hit Next.
- Move to the Local Backup Only section and hit on Browse. Now, choose the location where you want to save the backup company file.
- Choose and set the number of backup copies you want.
| Tip: Set up the backup reminder in the Online and Local Backup section. |
- It will run a quick test to ensure the backup file is in good shape.
- Once all is done, click OK.
- Hit on Save it Now and then Next.
Step 3: Create a Portable Company File
- Launch QB Desktop and sign in as an admin.
- Click on File and then Create Copy.
- Hit on Portable company file and then Next.
- Name the portable company file uniquely to avoid overwriting and separate it from the original company file.
- Choose the location where you want to save the file and save it somewhere in an easily accessible location.
- Once done, hit Save and then Next.
- Now, you have a portable company file that you can send online or save on a USB. This should look like this: [Unique company file name].qbm.
| Note: The portable company file is password protected; when you share the file and the password with someone, they can access everything. |
Step 4: Open a portable company file
Open a portable company file by following these steps:
- Sign in to your QuickBooks as an admin.
- Navigate to the File menu and click on Open or Restore Company.
- Click on Restore a portable file and then hit Next.
- Now, choose your portable company file. It shall look like this: [Unique company file name].qbm and click Open.
| Important: Avoid using the same name for the portable company file as the regular one and save it to a different location. |
- Read the mentioned notes on the Where do you want to restore the file page and hit on Next.
- Once done, click on Save.
- When opening the company file, QuickBooks Desktop will automatically reindexes your data. It will fix the issues related to the company file.
Read More: QuickBooks Crashes When Opening Company File
6. Utilize the QuickBooks Auto Data Recovery Tool
The Auto Data Recovery tool comes in handy when your recent transactions are lost. You recover all the transactions using the current Transaction Log file and a copy of your company file except the ones done in the last few hours.
a. Recover the Damaged Transactions Using the Original .TLG file with .QBW.adr File
Recover your recent transactions using your original Transactions Log file and ADR version of the company file:
- On your QuickBooks Desktop, create a new folder and name it as QBTest.
- Open the folder on the same location as your company file.
| Tip: Check the location of your company file on the Product Information screen. Press the F2 or Ctrl +1 keys on your keyboard and go to the No Open Company window. |
- Find the company file with .The TLG extension is at the end of your company folder. Show File Extensions If you cannot find the .TLG files, follow the below steps to see the hidden files and folders:
- Press the Windows + E keys together to launch File Explorer.
- Go to Organize and then select Folder and search options.
- Hit on Hide extensions for known file types.
- Hit on Apply and then OK.
- Copy the corresponding .TLG will be added to your company file and pasted into the QBTest folder on your desktop.

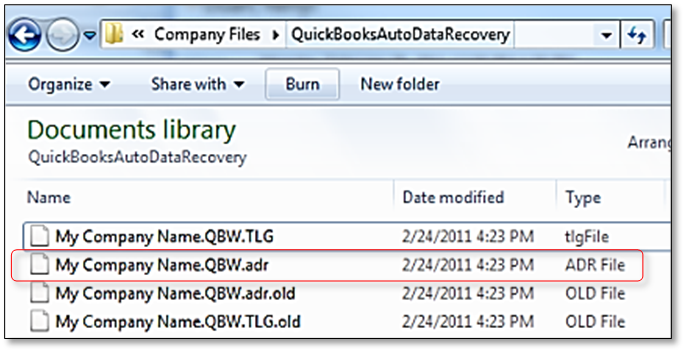
- Open your QuickBooksAutoDataRecovery folder. You will find it in the same location as your company file.
- Copy your .QBW.adr file and paste it to the QBTest folder just created. You have a .QBW.adr and .tlg file in your QBTest folder.
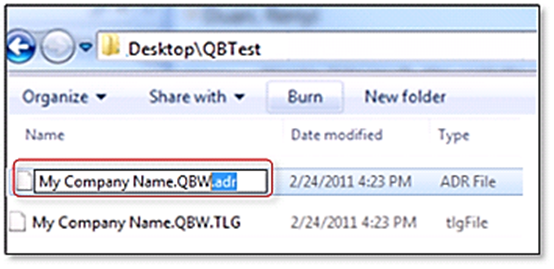
- Right-click the .QBW.adr file in your QBTest folder and select Rename.
- Remove the .adr extension from the end.
- Launch QB Desktop.
- Locate and open the company file you saved in the QBTest folder. Then, verify all of your transactions using the account register.
- Navigate to the File menu> Utilities> Rebuild Data to verify the data integrity.
- If your company file is good, move the damaged copy of your company file to a different location and transfer the copy from QBTest to the original location.
Read Also: How To Update QuickBooks Company File
b. Recover the Damaged Transactions Using .QBW.adr and .TLG.adr Files
Below, we will recover the damaged transactions using the ADR version of the .QBW and .TLG files. Your damaged company file will take at least 12 hours to recover.
- Create a new file folder on your desktop and name it as QBTest.
- Locate the folder where your company file is saved and look for the QuickBooksAutoDataRecovery file.
| Tip: Check your company’s location in the Product Information screen. Open the window by pressing the F2 or Ctrl+1 keys on your keyboard and then go to the No Company Open Window |
- Find the .TLG.adr and .QBW.adr files have the same name as your company file. Show file extensions If you cannot find the .TLG.adr and .QBW.adr files, follow the below steps to show the file extensions:
- Launch the Windows File Explorer by pressing the Windows+E on your keyboard.
- Click on Organize, then hit on Folder and search options.
- Tap on Hide extensions for known file types.
- Choose Apply, then click OK.
- Right-click on the .TLG.adr and .QBW.adr files and select Copy, then paste them to the QBTest folder.
- Go to the QBTest folder and remove the .adr from the end of these file names. Now, you will have the .qbw and .tlg files in your QBTest folder.
- Launch QuickBooks.
- Navigate to the QBTest folder, open your company file, and verify your transactions using the account register.
- Click on the File menu at the top and then Utilities. Select Verify Data to check the integrity of the recovered file.
- If the copy of your company file is good, remove the damaged company file from the original locations and move the copy from QBTest to the original location.
Finally, try again to open your company file or restore the backup file of QuickBooks to ensure QuickBooks error 6143 is fixed.
Conclusion
A company file error must be resolved as soon as possible to keep your data safe and protected. To help you resolve QuickBooks error 6143, we have covered a list of factors causing the error and suitable fixes to ensure you can open the company file.
However, solutions might not work sometimes, or the underlying cause might be different. If you get stuck, you must talk to a QuickBooks professional. Dial +1(866)409-5111 now!
Frequently Asked Questions
Error code 6143 in QuickBooks appears when a user fails to open the company file, usually in the single-user mode. This may happen due to an incorrect company file location, a file path that is too lengthy, or a damaged or corrupted company file.
Error 6XXX in QuickBooks is a set of multiple errors that mainly occur when opening or accessing company files or running related operations in single and multi-user networks. It often occurs when opening, restoring, or backing up a QuickBooks company file. This can be due to various reasons, including corruption .TLG or .ND files, incorrect network setup, or QuickBooks Database Server Manager issues.
Several problems can prevent you from opening a company file, including out-of-date software, file corruption, or incorrect file properties. Updating to the latest QuickBooks Desktop version, verifying file integrity, and making sure the file is in the correct location may help resolve the problem.
Intuit offers an in-built utility, Verify and Rebuild, that helps you fix the company file in QuickBooks. The Verify Data utility verifies the company file issues and errors, and the Rebuild Data utility runs a quick fix to ensure the error is resolved.
To locate the QuickBooks company file, you can either view the file path when you highlight a company in the Open Company window or navigate to the Open Previous Company list. The default location for QuickBooks company files is typically found in Intuit’s folder on your computer.

