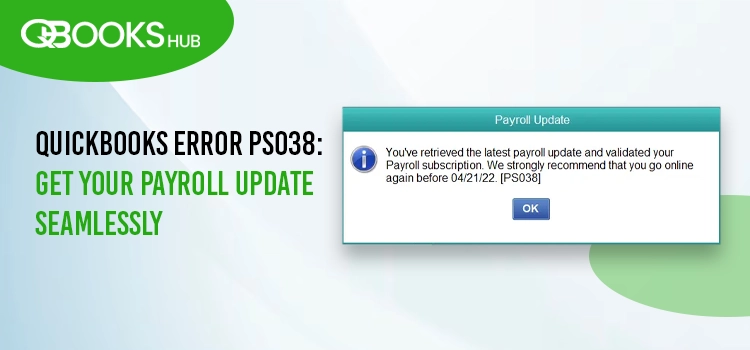
When running payroll, downloading the tax table updates or if the paycheck gets stuck as “Online to Send,” you might encounter QuickBooks error Ps038 on your screen stating,
“You’ve retrieved the latest payroll update and validated your payroll subscription”
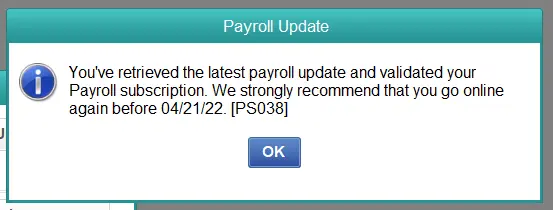
This might have disrupted your workflow and critical payroll operations, such as timely direct deposits, tax-related issues, and others.
If you are wondering what to do now, don’t worry; this blog is all you need! From covering all the possible factors that trigger the error code PS038 to troubleshooting solutions crafted by experts, we have covered everything to help you get back to business. Let’s get started…
QuickBooks Update Error PS038: An Overview
QuickBooks Update Error PS038 is one of the payroll series errors QuickBooks Error PSXXX was encountered when attempting to download the payroll updates and failed due to some reasons such as outdated QB, internet connectivity and others we will discuss later.
Meanwhile, there is a possibility of getting other errors, which we have mentioned in the table below in the same instance. If you encounter any of these errors, following the solutions below will help you eradicate them.
| Possible Payroll Errors | |
| QuickBooks Error PS033 | QuickBooks Error PS101 |
| QuickBooks Error PS032 | QuickBooks Error PS107 |
| QuickBooks Error PS036 | QuickBooks Error PS077 |
What Causes QuickBooks Error PS038 When Updating Payroll?
Your payroll update may get interrupted due to several reasons and may trigger error code PS038 with warning message on your screen. Troubleshooting requires finding out these factors to formulate an effective solution.
Let us take a look at the points below and understand what is hampering the update:
- Inactive payroll subscription
- Not using an up-to-date QuickBooks Desktop version
- Processes running in the background may hamper the payroll update
- Your paychecks might get stuck in QuickBooks when sending
- Possible data or corruption in your company file
- The Windows Firewall might be blocking QuickBooks program files
- Incorrect internet connection settings.
- Damaged file in the CPS folder
Can’t Run Payroll Update? Top Ways to Fix Payroll Error PS038
No need to worry about payroll updates anymore! The solutions below are crafted under expert assistance considering the factors that trigger QuickBooks payroll error PS038 when attempting to update payroll services.
Carefully execute the troubleshooting solutions below and ensure seamless payroll updates and operations promptly.
1. Ensure your have an active payroll subscription
Without an active payroll subscription, you won’t be able to run your payroll processes and even updates. Let’s follow the steps below to make sure you have an active payroll subscription:
- Exit your all the open company files and restart your computer.
- Launch QuickBooks and go to Employees.
- Select My Payroll Service and then click on Manage Service Key.
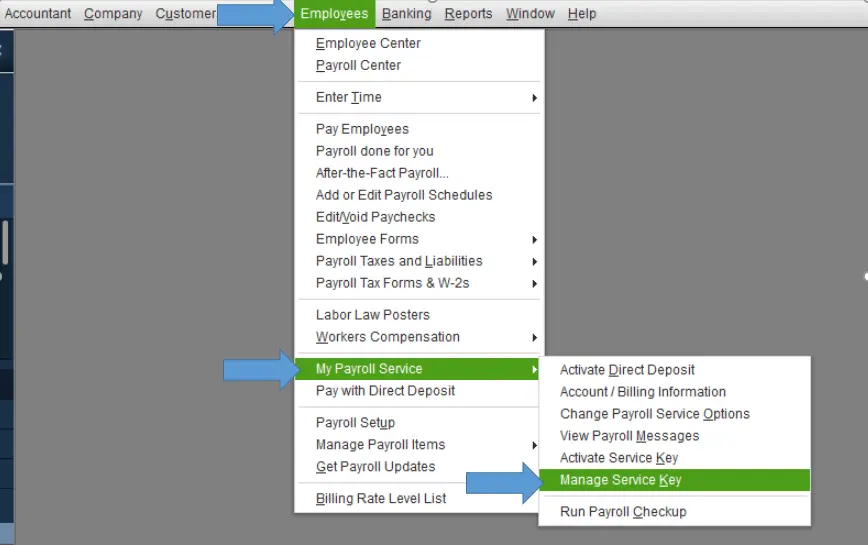
- Ensure the Service Name is correct and Status is Active.
- Click on Edit and verify the service key number. If it’s incorrect, find the accurate service key and enter it.
- Select Next, deselect the Open Payroll Setup box, then click Finish.
- This will update the payroll services entirely.
- If you still see the error, proceed to the next solution.
2. Register and update your QuickBooks Desktop
Updating your QuickBooks program to the latest release ensures the latest features and security patches, ensuring data security and seamless accounting management.
Let’s check if your QB program is registered to get the updates and update the program:
- Hit the F2 key on your keyboard to open the Product Information window.
- Check if it says Activated beside the license number.
- Let’s register the program if it doesn’t say Activated:
- Launch QB.
- Select Activate QuickBooks Desktop from the Help menu.
- Adhere to the on-screen instructions to verify the information.
- After you activate the program, update QuickBooks Desktop to the latest release.
- Now, download the latest payroll tax table.
- Go to the Employees menu and select Get Payroll Updates.
- Choose Download Entire Update.
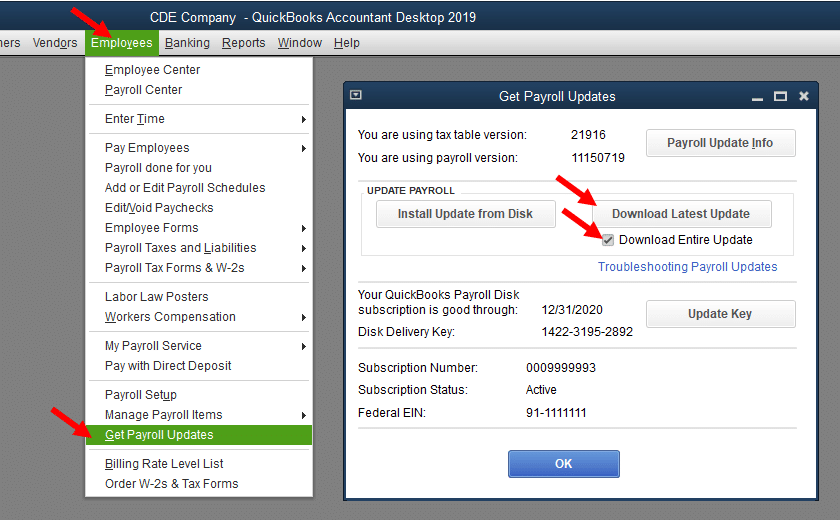
- Select Update. An informational window will prompt on your screen saying the download is complete.
3. Run Quick Fix my Program
The Quick Fix my Program utility closes or stops any processes running in the background used by QuickBooks, and makes quick fixes to your programs.
To access the utility, you must get the QuickBooks Tool Hub in the most recent version. Once done, proceed with the below steps:
- Choose Program Problems in the Tool Hub.
- Click on Quick Fix my Program.
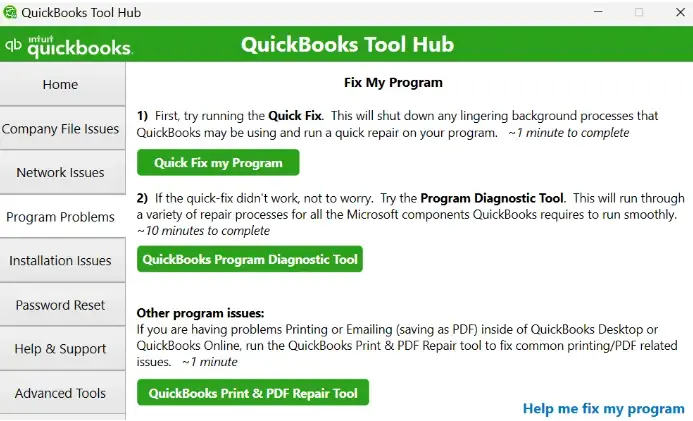
- Restart your QuickBooks and open the company file.
4. If Paycheck Gets Stuck as “Online to Send”
Your payroll updates or process may fail and trigger QuickBooks error PS038 on your screen causing paychecks to be stuck as “Online to Send.”
Perform the steps below to repair your company file and toggle these paychecks to send them.
a. Backup your QuickBooks company file data
Before performing the below steps, ensure your QuickBooks is up-to-date and create a company file backup following the below steps:
- Launch QB Desktop and navigate to the File menu> Switch to Single-user Mode.
- Move back to the File menu and select Back up Company, then select Create Local Backup.
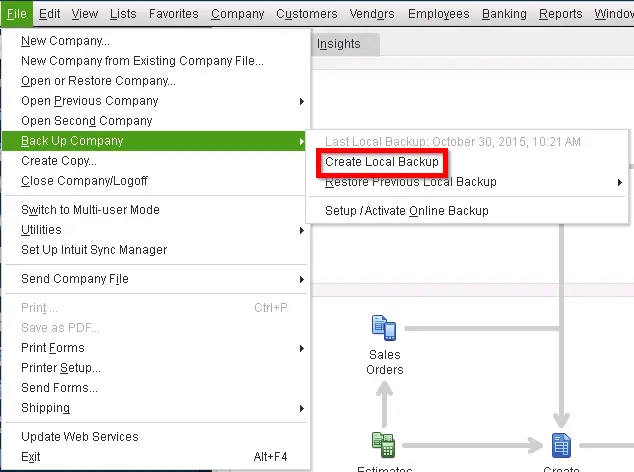
- Choose Local Backup in the prompted window and click Next.
- In the Local Backup Only section, click Browse and select the location to save the backup copy.
- Set the number of backup copy you want. (Optional)
| Tip: You don’t need to mark the backup date, simply create reminder in the Online and Local Backup section. |
- This will run a test to ensure the backup file is in good shape.
- When you are all set, click OK.
- Select Save it now, click Next.
- Once done, you will see a confirmation message.
b. Send your payroll data or usage data
- Navigate to Employees and select My Payroll Service.
- Click on Send Usage Data. If you don’t find the option, move to the next step.
- Go to Employees, select Send Payroll Data.
- Select Send All in the prompted Send/Receive Payroll Data window.
- Now, enter the payroll service PIN when prompted.
If the send is successful, retry to download the updates. If you still see the error, proceed with the next step.
If the send is unsuccessful, reach out to our QuickBooks support team.
c. Identify stuck paycheck
- Select Edit and then click Find.
- Go to the Advanced tab.
- Move to the Choose Filter section and select Detail Level from the Filter list.
- Click on Summary Only.
- Return to the Filter list and scroll down to select Online Status. Then, click on Online to Send.
- Choose Find and then you will find the paycheck that weren’t send to Intuit.
- Note down the “Number of matches” on the Find window.
- Now, proceed to the next step.
d. Verify and rebuild company file data
Exit the Find window and then verify your company file data. This will show the stuck paycheck waiting to be sent.
Verifying the company file data
- Navigate to Window and select Close All.
- Click on the File menu and then Utilities.
- Click on Verify Data. Now, you will see:
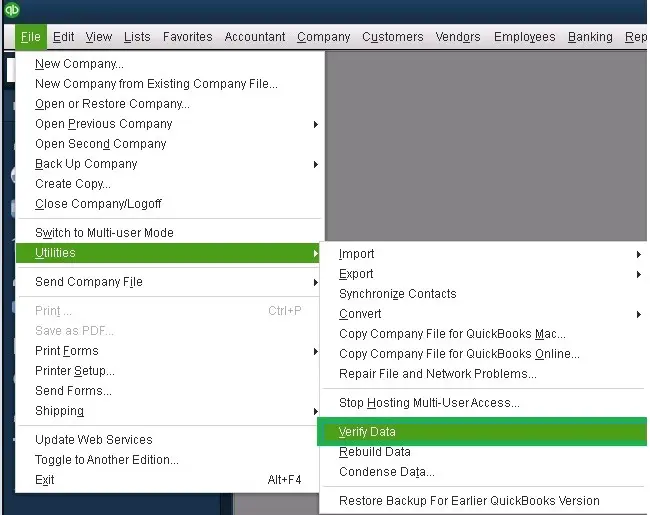
- QuickBooks detected no problems with your data – your data is clean and there’s no damage found.
- An unknown error message – check out website for the troubleshooting solutions.
- Your data has lost integrity – Data damage is found and you need to rebuild it.
Rebuilding the data damage
- Navigate to File> Utilities> then click on Rebuild Data.
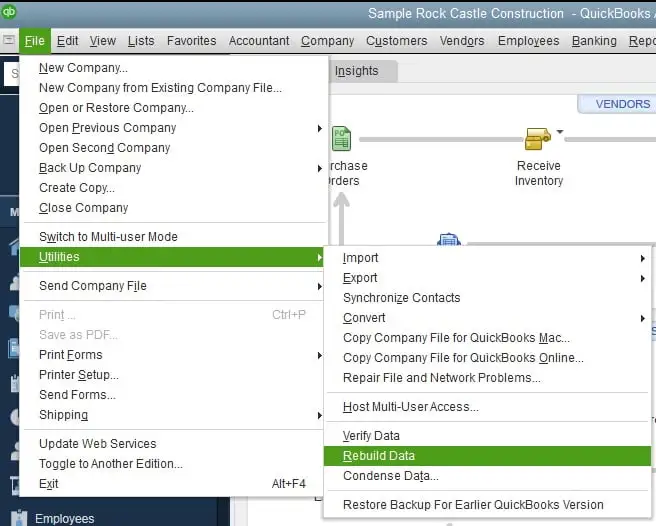
- Before rebuilding, you will be asked to create a company file backup to ensure the data safety. Click OK.
- Choose the location to save the backup copy on your computer. Make sure you are not replacing the already existing backup copy. Name the company file and select Save.
- Click OK when you get the Rebuild has completed.
Finally, try again to update the payroll services. Move to the next step if you fail to do so.
e. Toggle the stuck paycheck
- Open the oldest stuck paycheck.
- Hit the Paycheck Detail button.
- Under Earnings, add the same earnings item as last earnings item you entered in the list in the Review Paycheck window.
| Example: If you find the last item in the list as Hourly Rate, you must add another earning item named Hourly Rate to the list. |
- Select No when a Net Pay Locked message appear on your screen.
- Make sure there are no changes to the tax amounts and net pay in the paycheck. Now, click OK.
- Select Yes if you receive a Past Transaction message.
- Click Yes on the Recording Transaction warning message.
- Open the paycheck again and click on the Paycheck Details button.
- Delete the earning items you added in the Earnings section.
- Again review the paycheck and ensure there are no changes to the tax amounts and net pay. Then, click OK.
- Repeat the same step for each stuck paycheck.
- Once done, retry to download the payroll tax table again.
5. Set up firewall and security settings for QuickBooks Desktop
The Windows Firewall is a security application that controls the entry and exit of data on your computer. These include port numbers, IP addresses and more. Due to incorrect settings for QuickBooks Desktop or other reasons, the Firewall may consider it a threat and block the program.
Thus, you must Configure the Windows Firewall settings for QuickBooks and ensure you can update the payroll tax table easily.
6. Add Intuit as a Trusted Sites
Adding Intuit as a trusted site helps the browser know which site to trust, protects a user’s digital privacy, and reduces the risk of theft and cyber-attacks. This helps to maintain the overall system security.
a. Google Chrome
- Click on Customize and control Google Chrome and choose Settings.
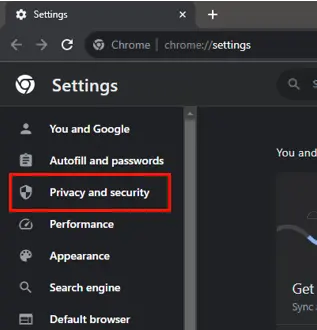
- Select Privacy and security from the left pane, then click on Third-party cookies.
- Hit on Add next to Allowed to use third-party cookies.
- Type intuit.com and then click Add to Save.
b. Safari
- Launch Safari, then enter intuit.com.
- Choose Enter.
- Hit on Bookmarks, then select Add Bookmark…
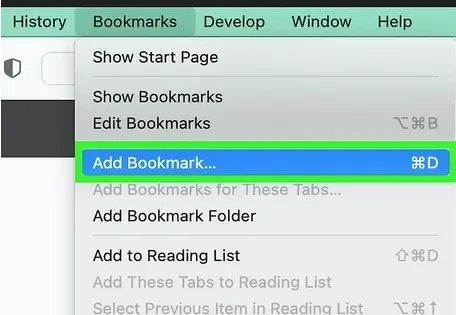
- Select Favorites under Add this page to: from the drop-down menu.
- Click Add.
c. Microsoft Edge
- Click on the Settings and more … and choose Settings.
- Select Cookies and site permissions from the left pane, then click on Manage and delete cookies and site data.
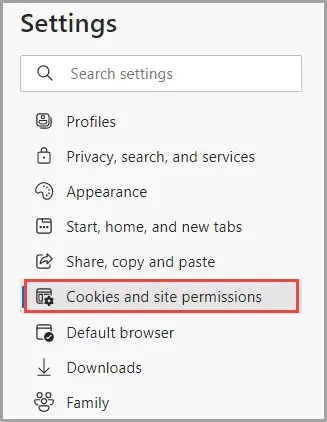
- Select Add from the Allow section.
- Type intuit.com, then click Add to save.
Summary
Failure to run or update payroll due to QuickBooks error PS038 can hamper your overall workflow, such as payroll data management and timely direct deposit, causing delays in every related task. However, following the above troubleshooting solutions will help you troubleshoot the error promptly and get back to your business.
If you get stuck somewhere or fail to fix the error, you must hand over the task to the professionals. Dial +1-866-409-5111 to connect with a QuickBooks ProAdvisor now!
Frequently Asked Questions
Error code PS038 mainly arises from stuck paychecks to Online to Send when downloading the payroll updates or running the related process. Consider toggling the stuck paychecks, updating the QuickBooks program and repairing your company file data to address the problem. Moreover, you can also try configuring the firewall ports for QuickBooks, allowing the connection during the updates.
Payroll updates fail primarily due to internet connectivity issues and using outdated QuickBooks and Windows operating systems. Additionally, issues such as data loss or corruption in the company file or no active payroll subscription also occur.
Do this to fix error PSXXX when updating the payroll services:
• Update QuickBooks Desktop
• Ensure your computer has an active and stable internet connection
• Toggle the stuck paycheck
• Make sure you have an active payroll subscription
• Repair your QuickBooks using Quick Fix my Program
Sometimes, payroll issues occurs, but QuickBooks Online Payroll offers a solution that minimizes their impact. The new Paycheck Correction feature allows you to amend errors even after payroll processing. This flexibility lets you manage and correct paychecks that were not entered in the current quarter.
Any of the payroll information might be incorrect in the payroll, showing correction in QuickBooks Online. To fix this:
• Identify and check the error right away.
• Ensure you have entered the correct amount of pay that the employee should have received.
• Make the required adjustments to your employee’s pay or any of the incorrect information.
About The Author